Waterproofing Membrane for Walls: When Interior Sealing Actually Works in Minneapolis
If your basement smells damp, shows a white chalky film on the concrete, or already has a half-finished wall someone framed years ago, you need to solve the moisture problem before drywall goes up. A waterproofing membrane for walls applied from the inside can work, but only in the right conditions. Minneapolis sits on heavy clay soil that holds water against foundations for weeks after a spring thaw. That changes the math. This guide walks you through, step by step, how to figure out whether interior sealing will hold up in your basement, and how to do it right if it will.
One note before you start. Interior sealing manages moisture; it does not stop water under pressure. If water pools on your floor after rain, no coating or membrane on the inside face of the wall will fix that alone. Keep that distinction in mind through every step below.
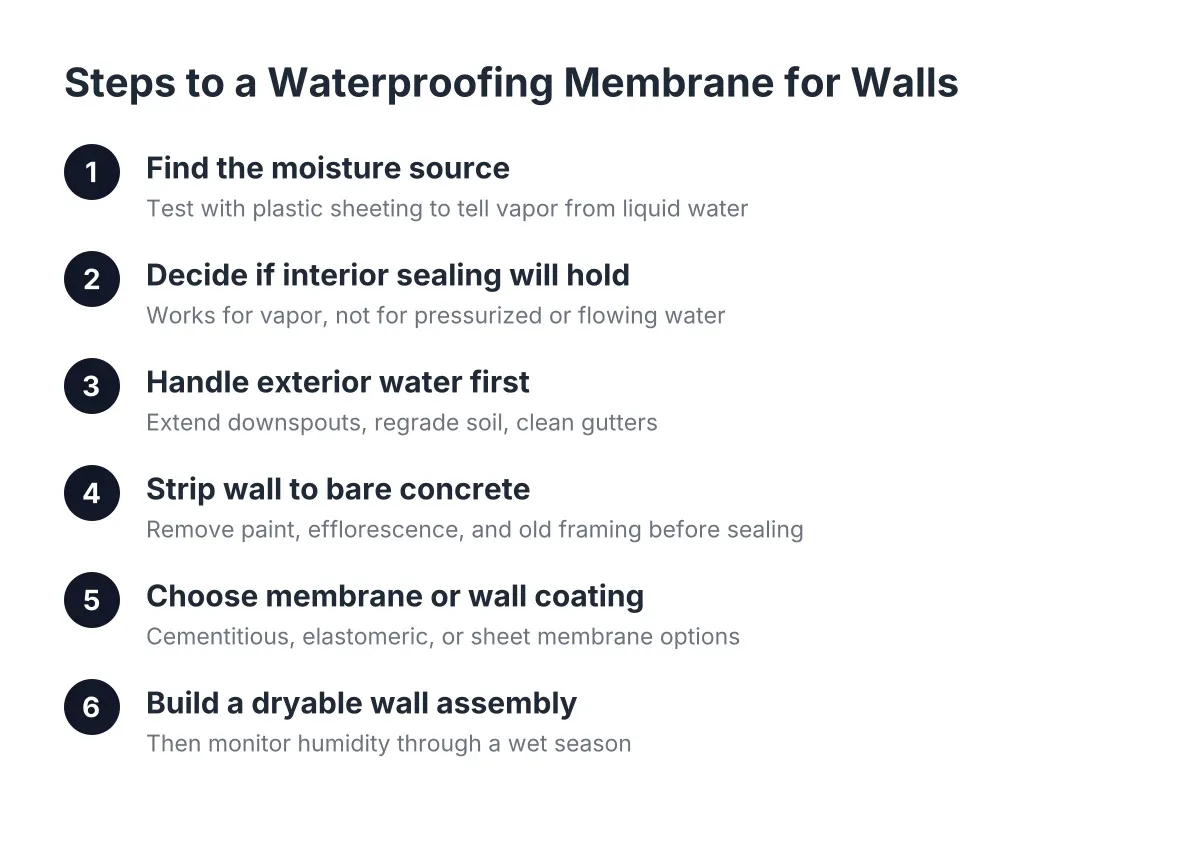
Step 1: Find Out Where the Moisture Is Coming From
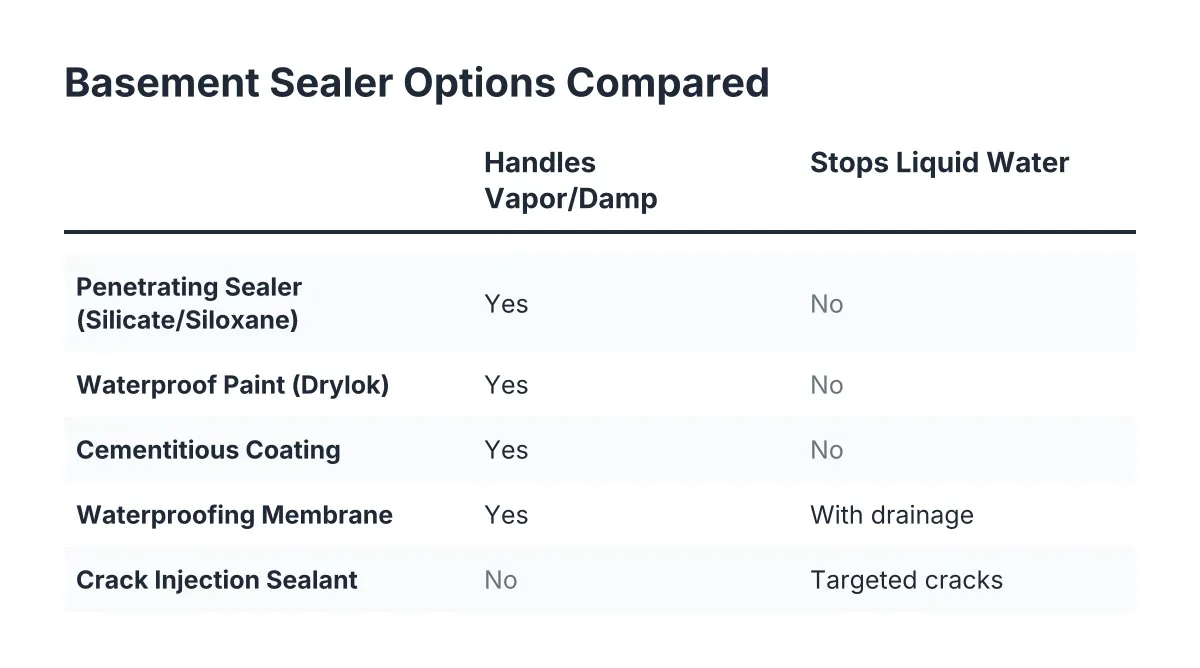
First, figure out whether you are dealing with vapor or liquid water. Vapor is moisture migrating through the porous concrete as humidity. Liquid water is an actual leak. Interior membranes and sealers handle vapor well. They fail against standing water pushing through the wall.
Tape a two-foot square of clear plastic sheeting to a bare section of concrete wall. Seal all four edges with tape. Wait 48 hours. If droplets form under the plastic, moisture is coming through the wall from outside. If droplets form on top of the plastic, your problem is interior humidity condensing on cold concrete, which calls for a dehumidifier and air sealing, not a membrane.
Also walk the basement after a hard rain. Look for these signs of basement water damage:
- White, powdery efflorescence on the concrete, which means water is moving through the wall and leaving minerals behind
- Dark streaks running down from the top of the foundation wall
- Rust on the bottom of steel posts or existing framing nails
- A tide line or staining low on the wall near the slab
- Musty smell that gets stronger in June and July
Minneapolis clay drains slowly, so a wall that looks dry in February can weep in May. If you can, check the basement across at least one wet season before you finish it.
Step 2: Decide If Interior Sealing Will Actually Hold
Interior sealing works when the wall handles vapor and damp spots, not flowing water. It is the right call when the plastic-sheet test shows moisture from outside but you never see pooled water, the walls feel cool and slightly damp in summer, and your grading and gutters are already doing their job.
However, interior sealing is the wrong tool in these cases:
- Water enters at the cove joint where the wall meets the slab after storms
- Hydrostatic pressure pushes water through cracks, which shows up as active trickles
- The foundation is old stone or block with hollow cores that channel water
Stone foundations deserve a special warning. The mortar in old stone walls often does not run continuously through the full thickness, so voids inside the wall can carry water from the soil straight to your floor. A coating on the interior face does nothing about that path. In that situation you need drainage, usually interior drain tile and a sump pump, before any finishing work.
One more common mistake worth naming. Pouring new concrete against an old wall to "cap" a leak does not work. The cold joint between new and old material will not hold back water. If a previous owner tried this in your half-finished basement, treat that area as unresolved.
Step 3: Handle the Water Outside First
Before you seal anything inside, cut off the easy water. This step costs little and does more than any product you can roll on.
- Extend downspouts at least six feet from the foundation. In clay soil, ten feet is better.
- Regrade soil so it slopes away from the house, about one inch per foot for the first six feet.
- Clean gutters so they do not overflow at the foundation during summer storms.
- Check window wells for standing water and add covers or gravel drainage if needed.
For example, say a homeowner in Minneapolis buys a house with a basement the previous owner framed and then abandoned. The basement smells musty every July. In that scenario, the fix often starts outside; two downspouts dumping next to the foundation were loading the clay soil, and the wall was wicking that moisture inward. Extending the downspouts and regrading may drop the wall from damp to dry enough that an interior membrane becomes a sound choice instead of a bandage.
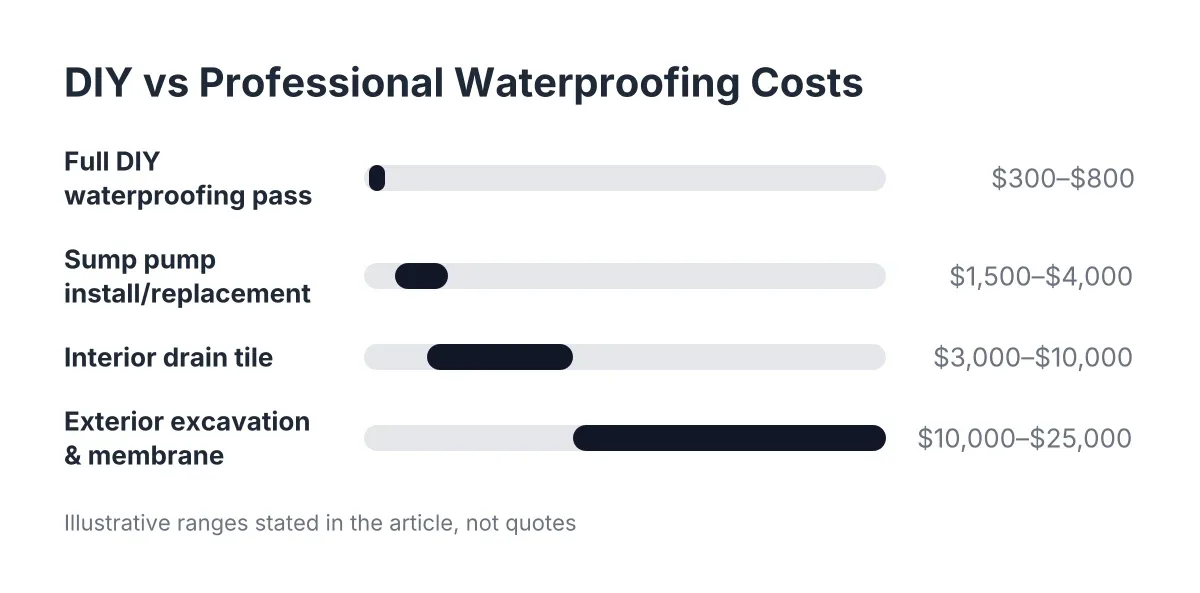
If exterior fixes and drainage cannot get the wall to that state, interior sealing alone will not save the project. That is when it makes sense to bring in a contractor to look at drain tile and sump pump options before finishing continues.
Step 4: Strip the Wall Back to Bare Concrete
A waterproofing membrane for walls only bonds to clean, bare masonry. If you inherited framing against the foundation, pull it away from any wall you plan to seal. This is also your chance to inspect for hidden mold, rot at the bottom plate, and rusted fasteners, which tell you how wet that wall has been.
Next, prep the surface:
- Remove old paint. Sealers and membranes will not bond over paint, and peeling paint is often a sign moisture is already pushing through.
- Scrub off efflorescence with a stiff brush. Some products call for an etching cleaner; follow the label.
- Patch cracks and the cove joint with hydraulic cement, which sets even against damp concrete.
- Let everything dry as much as conditions allow.
This is the step where the Half-Finished Basement Rescuer usually learns the truth about the previous work. If the bottom plates are dark, soft, or moldy, the moisture problem predates you and the sealing plan needs to come before any reuse of that framing. An honest assessment now beats tearing out drywall in three years.
Step 5: Choose Your Waterproofing Membrane or Wall Coating
For interior concrete and block walls, you have three realistic options in 2026, and they solve different problems.
Cementitious masonry waterproofers
Products like Drylok Original are thick, cement-based coatings you brush into bare masonry. They fill the pores of the concrete and resist modest vapor drive. Apply two coats, working the first coat into the surface in all directions rather than rolling it on thin. These are the standard choice for damp but not leaking poured or block walls.
Elastomeric and paint-style coatings
Kilz Basement and Masonry Waterproofing Paint and similar products roll on faster and bridge hairline texture, but they are still coatings, not structural barriers. Note that waterproofing paint for wood is a different product category entirely; do not use masonry coatings on framing or plates. Coatings work best as part of a plan, not as the whole plan.
Sheet membranes and dimpled wall protection
A dimpled plastic waterproofing membrane sheet for walls does something different. Instead of blocking moisture, it creates an air gap so any moisture that gets through the concrete drains down to the slab edge or drain tile instead of soaking your insulation. Dimpled membranes make sense on walls with a history of dampness where you want a capillary break behind the finished wall. They pair well with interior drain tile.
Rigid foam insulation glued directly to the concrete does double duty here. It insulates, and it acts as a vapor barrier that keeps interior air off the cold concrete while letting the wall manage its own moisture, which lowers the risk of mold behind the finished wall.
Step 6: Build a Wall Assembly That Can Dry
Sealing the concrete is half the job. The other half is framing and insulating so the wall cavity never traps moisture. Basement walls need moisture control in two directions: soil moisture wicking in from outside, and warm indoor air condensing on cold concrete from inside.
The most common finishing mistake in Minneapolis basements is stapling poly sheeting over the studs on the room side. That interior vapor barrier traps any moisture that enters the cavity, from air leaks or minor seepage, with no way to dry. Mold follows. Instead, put your vapor control against the concrete, using rigid foam or a membrane, keep framing off the wall by an inch or more, and skip the room-side poly so the cavity can dry inward.
The floor matters too. A basement vapor barrier or dimpled subfloor panel raised slightly off the slab lets moisture under the floor migrate and escape instead of pooling under carpet. Good basement moisture control treats the walls, floor, and air as one connected system, because vapor pressure pushing through porous concrete will find whichever surface you left unprotected.
Step 7: Control Humidity and Watch the Wall Through a Wet Season
After sealing, run a dehumidifier sized for the space and keep basement humidity near 50 percent through summer. Minneapolis summers are humid enough that even a well-sealed basement condenses moisture on cold surfaces without one. A sump pump with a working check valve backs up the whole system if your basement has drain tile.
Then wait and watch. Check the sealed walls after the spring thaw and after the first big summer storm. Look for new efflorescence, bubbling in the coating, or damp spots. Bubbling means water pressure behind the membrane, and that means drainage work, not another coat.
Finishing a basement that stays dry is worth the patience. Homeowners gave basement finishing a joy score of 9.5 out of 10 in the NAR Remodeling Impact Report, according to National Association of Realtors. That satisfaction depends on the space staying dry after the drywall goes up.
When to Bring In a Professional
Call a contractor before sealing if you see any active water entry, if the foundation is stone or shows structural cracks, or if you inherited framing and cannot tell what is safe to build on. A local contractor who knows Minneapolis clay soil and city permit requirements can tell you what to keep, what to tear out, and whether a waterproofing membrane for walls is the right fix or a delay of the real one. Getting that straight answer first is what turns a stalled, half-finished basement into a finished one that stays that way.
If you need basement finishing, Minneapolis Basement Finishing Pros can help.
Prefer to talk it through? Call (651) 758-8806 — a quick call is usually the fastest way to get a straight answer for your situation.