DIY Basement Waterproofing vs. Professional Sealing in Minneapolis: Cost and Durability
If your basement in Minneapolis, MN shows damp walls, a musty smell, or a water line from a past leak, you have to fix moisture before you finish anything. The real question is whether DIY vs professional waterproofing will work best for your situation: which route actually holds up in Minneapolis clay soil, and what does each one cost? This comparison walks through both, with the local details generic waterproofing guides skip.
Here is the short version. DIY methods like sealant paint and caulk cost a few hundred dollars and handle minor dampness. Professional work, like drain tile and sump systems, costs thousands but handles the hydrostatic pressure our clay soil puts on foundation walls. If you plan to finish the basement, the durability gap matters more than the price gap.
Why Minneapolis Basements Get Wet in the First Place
Most of the Twin Cities sits on heavy clay soil. Clay holds water instead of draining it. After a spring thaw or a heavy July storm, that water sits against your foundation and pushes inward. That push, called hydrostatic pressure, forces moisture through concrete block, poured walls, and floor slabs.
Moisture also moves as vapor, not just liquid. Vapor pressure pushes water through porous concrete even when you never see a puddle. That is why a treatment that only covers the symptom, like paint over a damp wall, often fails. The vapor keeps coming, and it needs somewhere to go.
Minneapolis adds one more wrinkle: freeze-thaw cycles. Water in the soil freezes, expands, and opens hairline cracks in foundation walls. A crack that stayed dry for years can start seeping after one hard winter. Any comparison of DIY and professional waterproofing has to account for that cycle, because a fix that works in a mild climate can fail here in two seasons.
DIY Basement Waterproofing Methods and Costs
DIY basement waterproofing means the products you can buy and apply yourself. In 2026, the common options are:
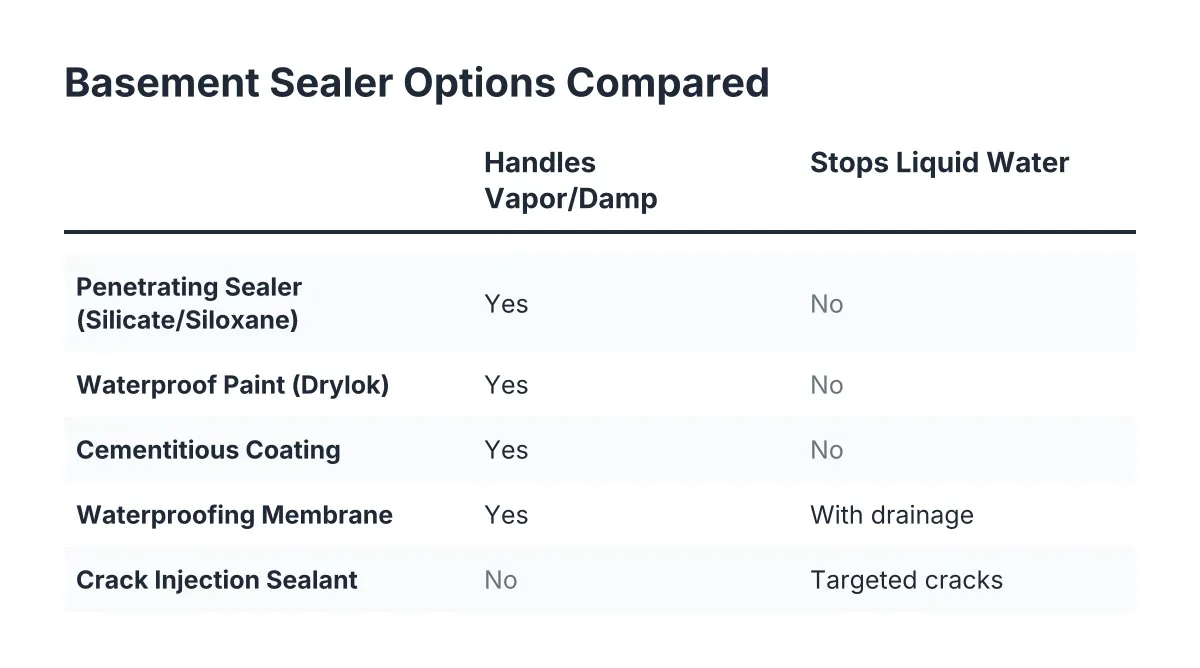
- Masonry waterproofing paint, such as Drylok Extreme, which you roll onto interior walls to resist moisture pushing through. Expect about $40 to $60 per gallon, and a typical basement takes several gallons for two coats.
- Liquid rubber foundation sealant, brushed or rolled onto the exterior foundation wall where you can reach it above grade, or onto interior surfaces. Budget roughly $50 to $100 per gallon depending on the product.
- Hydraulic cement and crack fillers for patching visible cracks in walls and floors, usually under $30 per repair.
- Exterior fixes: extending downspouts, regrading soil away from the house, and sealing around basement windows with exterior caulk. Often under $200 total in materials.
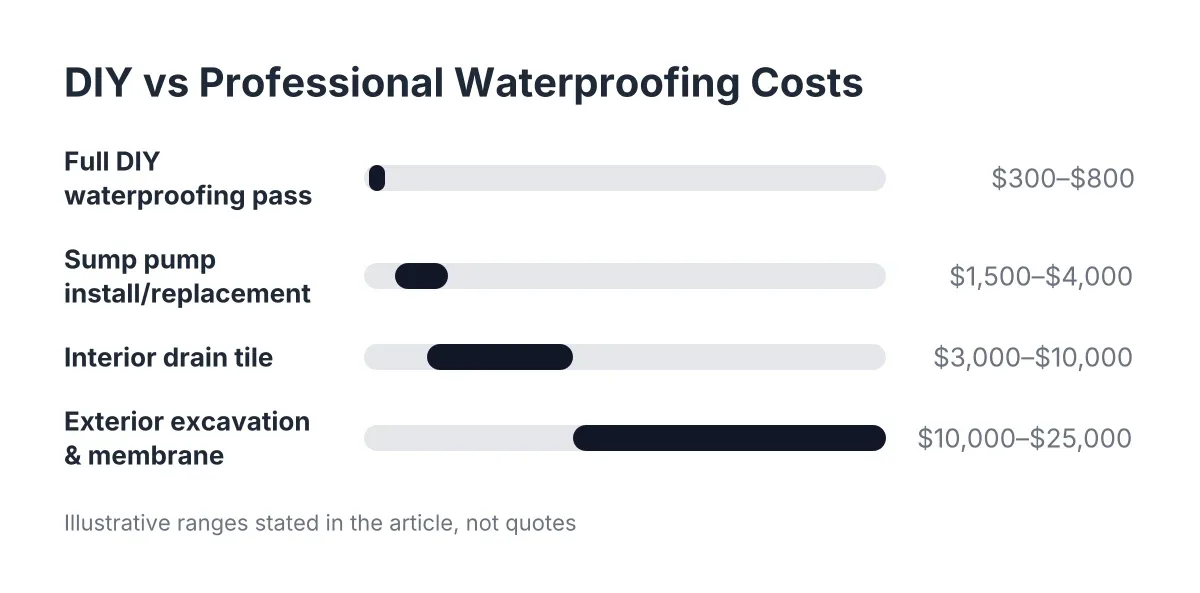
For a full DIY pass, a homeowner in Minneapolis might spend $300 to $800 in materials and two or three weekends of labor. That is real money saved compared to hiring out.
However, know what these products do and do not do. Waterproofing paint resists moisture coming through the wall surface; it does not stop water that is under pressure. If clay soil is pushing water at your foundation after every storm, paint blisters and peels within a year or two. The moisture behind it has nowhere to go, so it lifts the coating off the wall.
The exterior fixes are the strongest part of the DIY list. Moving roof water 6 to 10 feet away from the foundation and fixing grade solves a surprising share of wet-basement problems, and it costs almost nothing. Start there before you buy a single gallon of sealant.
Where DIY Holds Up
DIY works when the problem is minor and the source is manageable. A basement with light dampness on the walls in spring, no standing water, and no efflorescence buildup is a fair candidate. Seal the walls, patch the cracks, fix the gutters, and run a dehumidifier. For many older Minneapolis homes with dry-ish basements, that combination controls humidity well enough to keep storage safe and smells down.
Where DIY Fails
DIY fails when water is under pressure. Signs you are past the DIY stage:
- Water pools on the floor after heavy rain or snowmelt
- A white, chalky mineral crust (efflorescence) keeps returning after you clean it
- Paint or a previous coating is bubbling or flaking off the walls
- Cracks reopen or widen after winter
- The basement floods at the wall-floor joint, where the slab meets the wall
One more failure mode worth naming: pouring new concrete against an old wall to raise the floor or "cap" a leak. The seam between new and old concrete, the cold joint, will not hold back water. It looks solid and fails anyway.
Professional Basement Waterproofing Systems and Pricing
Professional waterproofing addresses pressure and drainage, not just the wall surface. The common systems in Minneapolis are:
- Interior drain tile: a crew cuts a channel around the slab perimeter, installs perforated pipe, and routes water to a sump basket. Illustrative cost: $3,000 to $10,000 depending on basement size and access.
- Sump pump installation or replacement, often with a battery backup for storm-related power outages. Roughly $1,500 to $4,000 as an estimate.
- Exterior excavation and a basement waterproofing membrane: digging down to the footing and applying a membrane and drainage board to the outside of the foundation. This is the most complete fix and the most expensive, often $10,000 to $25,000 as a ballpark.
- Foundation crack injection, epoxy or polyurethane injected into cracks from the inside, typically a few hundred dollars per crack.
These are illustrative ranges, not quotes. Your foundation type, lot grade, and access all move the number.
The durability difference is the point. Drain tile and a sump system give pressurized water a path out instead of trying to block it. A properly installed exterior membrane stops water before it ever touches the wall. Both approaches routinely last decades. A coat of sealant paint fighting hydrostatic pressure might last two winters.
DIY vs. Professional Waterproofing: The Trade-Offs Side by Side
Here is how the two routes compare on the factors that matter before a basement finishing project:
- Upfront cost: DIY wins, usually $300 to $800 versus $3,000 to $25,000 for professional systems.
- Durability under clay-soil pressure: professional wins. Surface coatings fail under hydrostatic pressure; drainage systems relieve it.
- Fit for finishing: professional wins for any basement with a water history. Once drywall and flooring go in, a failed DIY seal means tearing out finished work.
- Time: DIY takes your weekends. A typical crew installs interior drain tile in two to four days.
- Risk of doing it wrong: DIY carries the risk quietly. A bad seal hides moisture until mold shows up behind the wall.
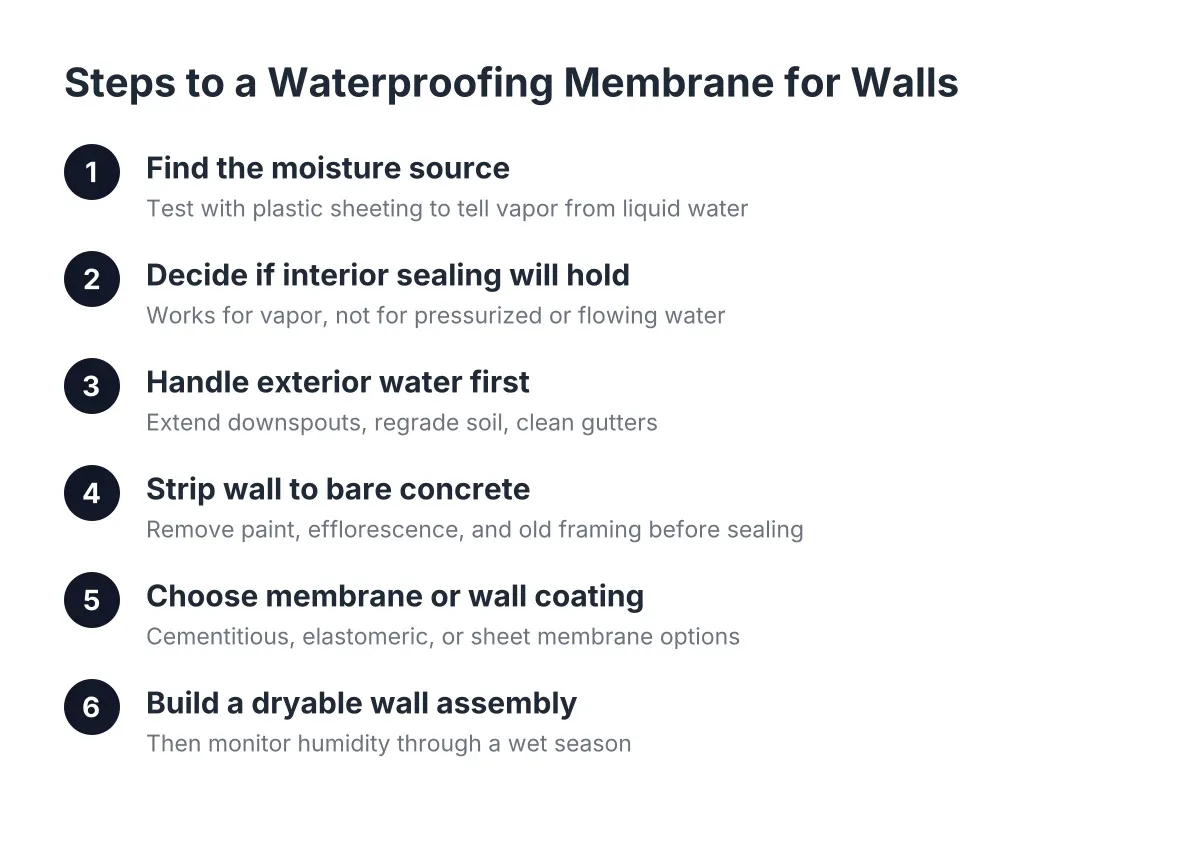
Suppose a homeowner in Minneapolis buys a house with a half-finished basement. The previous owner framed the walls, then the project stalled. There is a faint water line on the block, six inches up. In that scenario, rolling Drylok behind the existing studs is a gamble; the smarter sequence is to open the wall, confirm the source, and put drainage in first. Framing over a pressurized leak is how finished basements get torn out three years later.
What Has to Happen Before You Finish the Basement
Whichever route you choose, moisture has to be resolved before insulation and drywall go up. Insulating over an unresolved water problem traps moisture in the wall assembly, and the framing degrades fast. This is the step that separates a finished basement that lasts from one that grows mold behind the drywall.
A few sequencing rules matter in a cold climate like ours:
- Fix drainage first: gutters, grade, and any needed drain tile or sump work.
- Control vapor in both directions. Warm interior air condensing on cold concrete is as damaging as soil moisture wicking in from outside.
- Skip the interior poly vapor barrier on stud walls. Plastic on the room side of basement framing traps moisture in the cavity, where it cannot dry.
- Choose insulation that resists air and vapor movement, such as rigid foam against the concrete, so warm air never reaches the cold wall.
- Consider a subfloor system even if the slab has a vapor barrier beneath it. A subfloor protects flooring from a future moisture event, which matters in a state with spring melts. A vapor barrier under the slab blocks ground moisture from moving up into the concrete, according to W. R. Meadows, but it does nothing for water that arrives at the walls.
Good basement moisture control is not one product; it is drainage, vapor management, and the right wall assembly working together. Get those three right and the finishing work on top of them is straightforward.
How to Choose Between DIY and Professional Waterproofing Solutions
Choosing between DIY basement waterproofing and professional work comes down to one question: is water under pressure, or is this surface dampness? Dampness with no pooling, no recurring efflorescence, and no history of flooding is a reasonable DIY project. Any standing water, seasonal seepage, or wall-floor joint leaking calls for a professional drainage system before you spend a dollar on finishing.
A practical way to decide:
- Fix gutters, downspouts, and grading first. It is cheap and it helps either way.
- Watch the basement through one wet season, ideally the spring melt.
- If it stays dry, DIY sealing plus a dehumidifier is a fair plan.
- If water shows up, price professional drainage before you frame anything.
The trade-off is honest on both sides. DIY saves thousands upfront but can hide a problem that resurfaces after the walls are closed. Professional work costs more than most first-time finishers expect, but it protects the $15,000 to $40,000 you are about to put into the finish. Homeowners rated basement finishing a 9.5 out of 10 joy score, according to the National Association of Realtors; that satisfaction depends on the space staying dry.
One caution: if your foundation shows bowing walls, horizontal cracks, or stair-step cracking in block, bring in a structural professional before any waterproofing, DIY or otherwise. Those are structural signals, not just moisture signals.
For homeowners in Minneapolis, MN weighing this decision before a finishing project, the sequence matters more than the brand of sealant. Solve the water, verify it through a wet season, then build. That order is what keeps a finished basement finished.
If you need basement finishing, Minneapolis Basement Finishing Pros can help.
Prefer to talk it through? Call (651) 758-8806 — a quick call is usually the fastest way to get a straight answer for your situation.