ADA Compliant Basement Bathroom Design: Accessibility in Tight Spaces
Building an ADA compliant basement bathroom in Minneapolis, MN means solving two problems at once: accessibility clearances that eat floor space, and below-grade plumbing that rarely lines up where you want it. When planning an accessible basement bathroom layout, you're solving for both floor constraints and existing plumbing infrastructure. Strictly speaking, ADA is a commercial standard, and most homes are not required to follow it. However, investors use "ADA compliant" as shorthand for a roll-friendly, grab-bar-ready bathroom that appraisers and buyers notice. If you flip houses or hold rentals, an accessible basement bathroom widens your buyer pool, especially for multigenerational households. This guide walks through the build step by step, with straight answers on the plumbing tradeoff that decides your budget: gravity drain versus ejector pump.
One number worth knowing before you start. According to the National Association of Realtors, 64% of basement finishing costs are recovered at resale, one of the highest recovery rates among 20 common projects studied. An accessible bathroom can push a basement finish from "nice" to "sells the house."
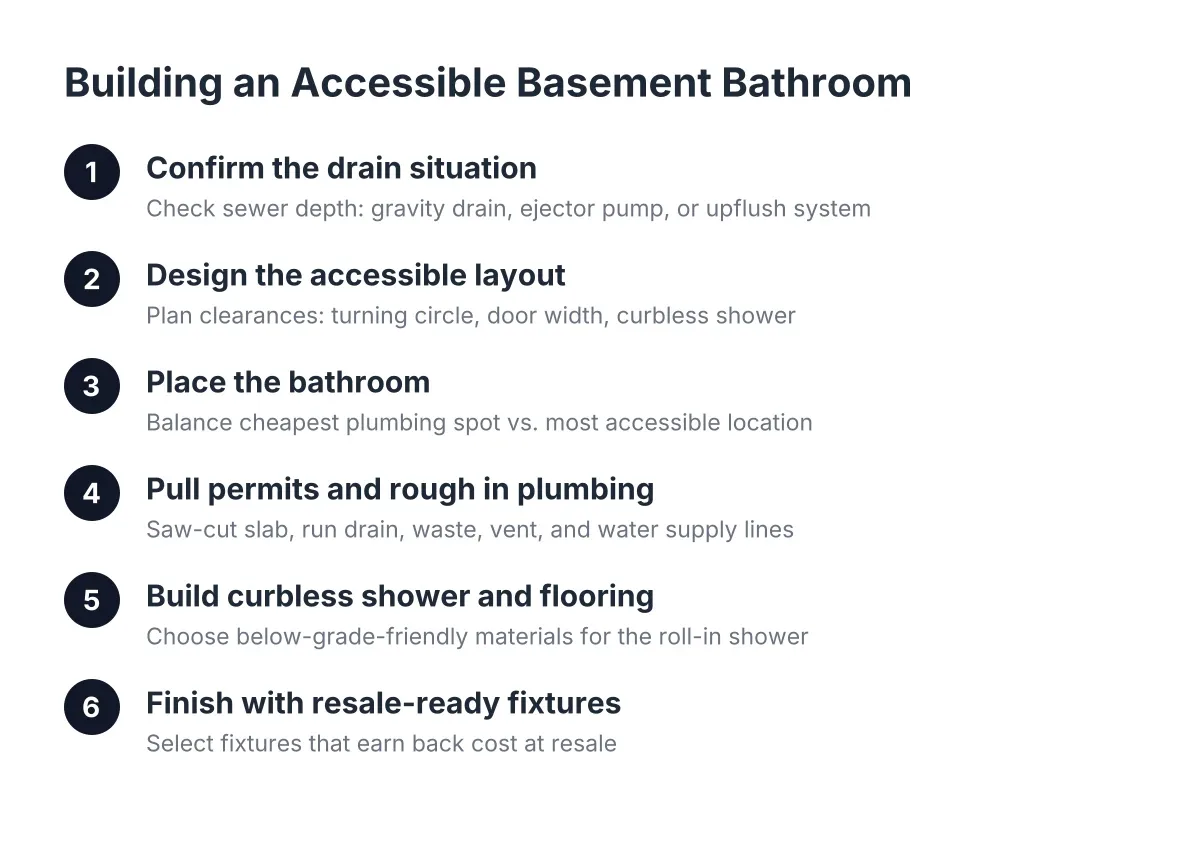
Step 1: Confirm the Drain Situation Before You Draw Anything
First, find out where your sewage leaves the house and how deep it sits. This single fact drives the whole project. If your main sewer line exits below the basement slab with enough fall, you can gravity-drain the new bathroom. If it exits higher, you need a sewage ejector pump or an upflush toilet system.
Here is the honest tradeoff:
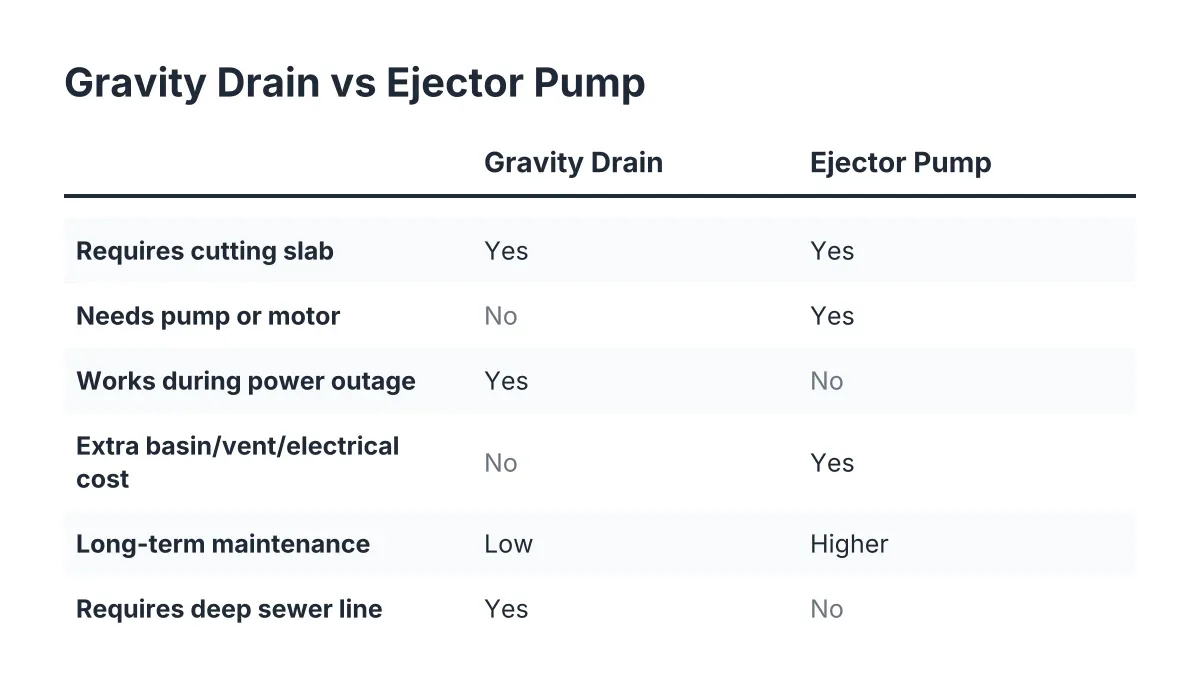
- Gravity drain: Cheapest to run long-term, no pump to fail, but it requires breaking and trenching the slab to reach the main line. If the main is too shallow, gravity is off the table no matter what you spend.
- Sewage ejector pump: A pit and pump below the slab collect waste and push it up to the main line. It adds equipment cost, a vent requirement, and a motor that will eventually need replacement. It also works in nearly any Minneapolis basement.
- Upflush toilet system: A macerating unit behind the toilet grinds and pumps waste up without breaking the slab. Lower install cost, but the unit sits in the room, limits fixture placement, and is the least liked option by future buyers and inspectors.
For a flip or rental, the ejector pump is usually the right call when gravity is not available. It hides below the slab, handles a full bathroom group, and reads as permanent to an appraiser in a way an upflush unit does not. Many homes in Minneapolis already have a rough-in or an existing pit, which cuts the plumbing bill substantially. Check for a capped pipe or a round cover in the slab before you assume you are starting from zero.
Step 2: Design an Accessible Basement Bathroom Layout with Proper Clearances
Next, lock in the space requirements, because accessibility is decided at the layout stage, not the fixture stage. An ADA compliant basement bathroom needs room to move, and that conflicts with the small footprints most basement bathrooms get.
Plan around these targets:
- A 60-inch turning circle, or a T-shaped turning space where a full circle will not fit
- A 36-inch wide door, swinging out or pocket-style so it never blocks the clear floor space
- 30-by-48-inch clear floor space at the sink, with knee clearance underneath (wall-hung or open-front vanity)
- Toilet centered 16 to 18 inches from the side wall, with blocking in the wall for grab bars
- A curbless shower entry, 36 by 36 inches minimum, with 60 by 30 inches preferred for roll-in use
In practice, that means an accessible basement bathroom layout wants about 40 to 60 square feet, where a standard basement half bath squeezes into 20. Before you commit, sketch the clearances on the slab with painter's tape. If the turning circle overlaps the door swing or the ejector pit location, fix it on paper, not after the concrete saw shows up.
Step 3: Place the Bathroom Where Plumbing and Access Agree
Now pick the spot. The cheapest location is next to the existing stack or rough-in. The most accessible location is near the bottom of the stairs or the walkout entry, on a direct path with no steps or tight turns. Sometimes those are the same corner; often they are not.
A common layout mistake is leaving the area at the base of the stairs as dead storage and pushing the bathroom to a far corner. That wastes the most usable real estate in the basement and forces a long, awkward path to the bathroom. If the home has a walkout basement, placing the accessible bathroom near that level entry adds real value for aging buyers and rental tenants who want to avoid stairs entirely.
For example, suppose an investor buys a 1950s Minneapolis rambler with a capped rough-in near the laundry area, 8 feet from the stairs. In that scenario, building the accessible basement bathroom layout at the rough-in saves an estimated $2,000 to $5,000 in slab cutting and drain runs, and the location still sits on a direct path from the stairs. That is the kind of alignment you look for before any demolition.
Also think about ceiling height and ductwork. Grab bars and roll-in showers do not help if a beam forces a 6-foot-6 soffit over the toilet. Walk the space with a tape measure before you fall in love with a floor plan.
Step 4: Pull Permits and Rough In the Plumbing
Do not skip permits on this one. A basement bathroom involves drain, waste, vent, water supply, and usually electrical work, and all of it gets inspected in Minneapolis. An unpermitted bathroom is a liability at resale; a buyer's inspector will flag it, and you will negotiate from a weak position. As of 2026, plan on plumbing, electrical, and building permits for a full bathroom addition.
The rough-in sequence looks like this:
- Saw-cut and trench the slab for drain lines, or set the ejector pit if gravity is not available.
- Run drain and vent piping, including the dedicated vent an ejector pit requires.
- Pressure-test the drains and call for the underground inspection before pouring concrete back.
- Run water supply lines and set the shower valve at an accessible height, 38 to 48 inches off the floor.
- Frame walls with solid blocking at 33 to 36 inches for grab bars at the toilet and shower.
The blocking step is where accessible bathrooms get quietly ruined. Grab bars must anchor into solid wood, not drywall. Installing blocking during framing costs a few dollars in lumber; retrofitting it later means opening finished walls. Experienced basement plumbing contractors will also set the ejector pit lid where it stays reachable for service, since the pump is a mechanical part that will need attention eventually, not a bury-and-forget item.
Step 5: Build the Curbless Shower and Pick Flooring That Works Below Grade
A curbless shower is the centerpiece of basement bathroom accessibility, and the basement slab makes it harder than it sounds. You cannot recess the shower floor into dirt without cutting concrete, so you either depress the slab in the shower area during the trenching work, or build up the bathroom floor slightly and slope into the drain. Decide this in Step 4, not after the slab is patched.
For flooring, below-grade moisture rules out anything that cannot handle vapor coming up through the concrete. A vapor barrier under the slab is designed to block ground moisture from moving into the concrete, according to W. R. Meadows, but many older Minneapolis homes were poured without one. Choose accordingly:
- Porcelain or ceramic tile: The standard for an accessible basement bathroom layout; pick a textured, slip-resistant finish and keep transitions flush.
- Luxury vinyl tile: Moisture-tolerant and budget-friendly for rentals, with flush transitions possible.
- Avoid: Thick mortar beds or raised subfloors that create a step at the bathroom door, which defeats the accessible entry.
In addition, vent the room properly. An exhaust fan ducted to the exterior is not optional in a below-grade bathroom; trapped humidity in a basement grows mold fast.
Step 6: Finish with Fixtures That Earn Their Cost at Resale
Finally, spend where appraisers and buyers can see the function. A wall-hung sink with insulated pipes, a comfort-height toilet, two grab bars, lever handles, a handheld shower on a slide bar, and bright, even lighting. None of these are luxury items, and together they make the bathroom usable for a wheelchair user, a grandparent, or a tenant recovering from knee surgery.
For the ROI math, keep the whole basement in frame. Angi puts average basement remodel costs at $30 to $75 per square foot, and resale recovery varies widely by market, from 23% to as high as 86% according to Zonda and the Journal of Light Construction. A bathroom is the piece of basement bathroom remodeling that most reliably moves appraised value, because it turns a rec room into livable space a family can actually use. The accessible version costs an estimated 10 to 20% more than a standard basement bathroom, mostly in the larger footprint and curbless shower work, and it differentiates your listing in a market full of cramped basement half baths.
One honest limitation: true ADA certification does not exist for private homes, so never market a flip as "ADA certified." Describe it as accessible or wheelchair-friendly, and have a licensed plumber and your local inspector confirm the drain, vent, and ejector details before you cut concrete. Below-grade plumbing mistakes are expensive to unwind.
Quick Checklist for an Accessible Basement Bathroom Layout
- Drain path confirmed: gravity, ejector pump, or upflush, in that order of preference
- 60-inch turning space, 36-inch door, curbless shower planned on paper first
- Permits pulled; underground plumbing inspected before the slab is patched
- Grab bar blocking installed during framing
- Slip-resistant, moisture-tolerant flooring with flush transitions
- Exhaust fan ducted outside
Work the steps in order and the bathroom basement buyers walk into will feel like it was always part of the house, not an afterthought bolted onto the furnace room. For homeowners in Minneapolis, MN weighing the numbers, that is the difference between a basement that appraises and one that just photographs well.
If you need basement finishing, Minneapolis Basement Finishing Pros can help.
Prefer to talk it through? Call (651) 758-8806 — a quick call is usually the fastest way to get a straight answer for your situation.