Basement Insulation for Minneapolis: Fiberglass vs. Foam Before You Finish
Here is the problem with most basement insulation advice: it was written for a house in a mild climate with dry ground. Minneapolis basements deal with concrete walls that sit against cold, damp soil for six months a year. That changes the answer. Fiberglass batts, the default choice for the rest of the house, behave differently against a foundation wall than they do in an attic. If you insulate a Minneapolis basement the wrong way, you will not see the problem for a year or two. Then you will smell it.
This guide walks through the fiberglass versus foam question the way a contractor would explain it at your kitchen table, before any sales pitch and before any drywall goes up. It covers why basement walls are a moisture problem first and an insulation problem second, what each material actually does against concrete, what Minnesota code expects in 2026, and what to do if you bought a house where somebody already framed and stuffed the walls with batts.
Why Basement Walls Are a Moisture Problem First
Concrete is not waterproof. It is more like a stiff sponge. Ground moisture moves through foundation walls as vapor all year, even in a basement that has never had standing water. In summer, warm humid air also finds the cool concrete and condenses on it, the same way a cold glass sweats on a July afternoon.
Above grade, insulation mostly has one job: slow heat loss. Below grade, it has two jobs. It has to slow heat loss, and it has to handle that constant, low-level moisture without feeding mold. Any material that absorbs water or gives mold something to eat is working against you down there.
Therefore, the first rule of basement insulation in Minneapolis is simple. Fix water problems before you insulate anything. If your floor gets damp in spring, if you see white mineral staining on the walls, or if a downspout dumps against the foundation, deal with that first. Insulating over an active moisture problem hides it, traps it, and speeds up the damage behind the finished wall.
Fiberglass Against Concrete: Why the Default Choice Backfires
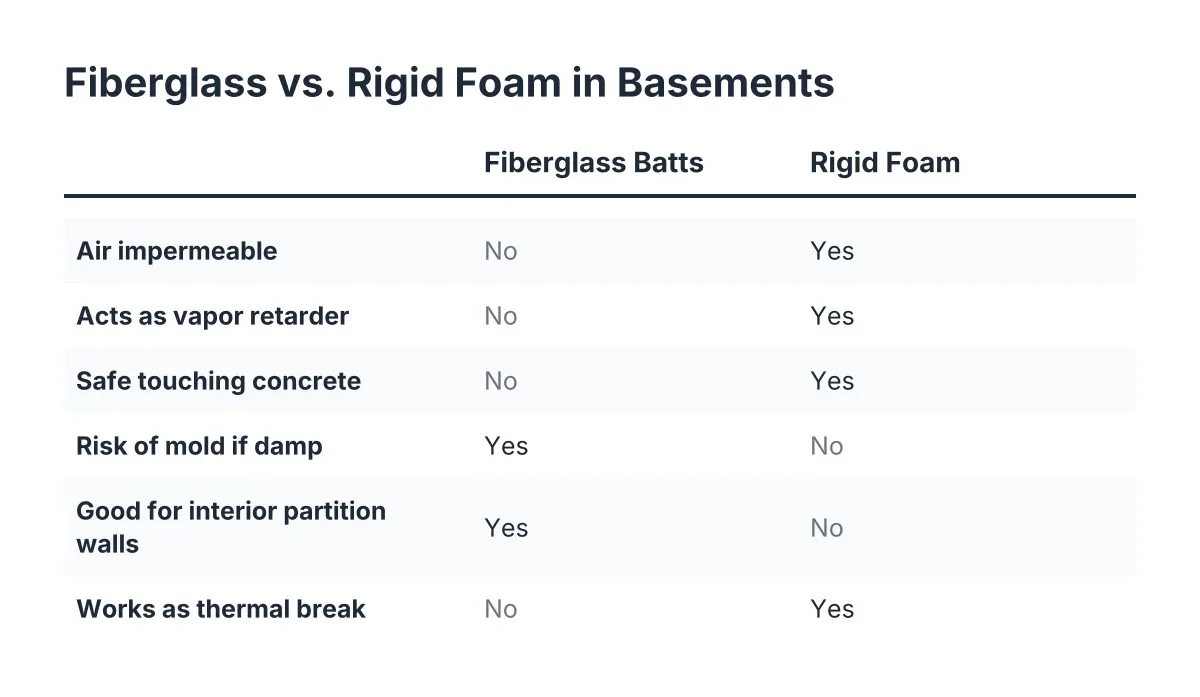
Fiberglass batts fail against basement concrete for one core reason: fiberglass is air permeable. Warm indoor air passes through it, hits the cold concrete behind it, and condenses. The batt then holds that moisture against the wall and against your framing like a wet sweater. Mold follows, usually where you cannot see it.
This is why so many half-finished basements in Minneapolis have that musty smell. Someone framed a wall an inch off the concrete, stuffed it with batts, maybe stapled up plastic sheeting, and hung drywall. Everything looked fine on day one. Two winters later, the bottom plates are dark, the paper facing is spotted, and the drywall reads high on a moisture meter.
The blanket insulation many builders staple to basement walls deserves a mention here. That white vinyl-faced basement insulation blanket you see in newer unfinished basements meets the minimum thermal code for an unfinished space. It was never meant to be framed against and buried behind drywall. Building directly over it traps moisture between the blanket and the new wall, so it needs to come down before finishing work starts.
None of this means fiberglass is useless in a basement. It still works fine in interior partition walls for sound, and it has a limited supporting role against exterior walls, which we will get to. It just cannot be the layer that touches, or nearly touches, the concrete.
Why Rigid Foam Wins in a Minneapolis Basement
Rigid foam board handles the below-grade job because it does three things fiberglass cannot. It resists air movement, so warm air never reaches the cold concrete to condense. It acts as a vapor retarder, keeping ground moisture out of the wall cavity while letting the concrete itself manage its own moisture. And it delivers solid R-value per inch in a thin layer, which matters when every inch of foam is an inch of floor space you lose.
Foam against the foundation also works as a thermal break. The concrete stays on its side of the foam, cold and damp, while the framing, drywall, and room air stay on the warm dry side. As a result, basement temperatures hold steadier through a Minnesota winter, and the finished space stops feeling like a finished garage.
Which Rigid Foam Panels Work on Basement Walls
Several rigid foam types work below grade, and the differences matter less than one rule: avoid anything with organic facers. Paper or cellulose-faced panels give mold a food source if they ever get damp. Beyond that, the common basement insulation panels break down like this:
- EPS (expanded polystyrene): The white beadboard. Lowest cost per R, handles moisture fine, needs a little more thickness to hit the same R-value.
- XPS (extruded polystyrene): The pink or blue board. Denser, about R-5 per inch, a longtime basement standard.
- GPS (graphite polystyrene): EPS with graphite added for better R-value per inch. A solid middle option.
- Polyiso: Highest R per inch, but only with foil or fiberglass facers. Skip any polyiso with paper facers below grade.
Whichever board you choose, the seams get taped so the layer works as a continuous air barrier. The foam runs from the slab all the way up to the floor joists with no gaps, so no strip of bare concrete is left exposed to room air where condensation can start. Done right, taped rigid foam and closed-cell spray foam are the two approaches that check all three boxes: air impermeable, vapor retarding, and high R-value.
Where Closed-Cell Spray Foam Fits
Closed-cell spray foam does everything rigid board does and conforms to irregular surfaces, which makes it the better tool for rubble foundations, stone walls, and the rim joist area where the house frame sits on the foundation. The rim joist leaks more air than almost any other spot in an older Minneapolis house, and spray foam seals it in one pass.
The trade-off is cost and flexibility. Spray foam runs meaningfully more per square foot than board, it requires a pro with the right equipment, and it is permanent. If you ever need to get back to the concrete, you are cutting foam off the wall. For flat block or poured walls, taped rigid board usually gives you the same performance for less money.
The Hybrid Wall Most Contractors Build
In practice, a well-built finished basement wall in Minneapolis often uses both materials. Rigid foam goes against the concrete as the moisture and air control layer. A framed 2×4 wall goes in front of it, holding wiring and plumbing. Then unfaced fiberglass batts fill the stud bays for extra R-value, safely on the warm dry side of the foam where condensation cannot reach them.
This hybrid approach is how fiberglass earns its way back into the basement. The foam does the job fiberglass cannot, and the fiberglass adds cheap R-value where it is finally safe to use. Fire blocking also goes in during this phase, sealing the gaps at the top of walls and around penetrations so the framed cavities meet code.
What Minnesota Code Expects From Basement Insulation
Minnesota's energy code treats basement walls as part of the home's thermal envelope, so a finished basement wall in the Minneapolis climate zone needs continuous insulation or an approved cavity assembly that hits the required R-value, commonly met with about R-15 of continuous foam or a foam-plus-batt combination. Your permit reviewer confirms the exact basement insulation requirements for your project when plans are submitted.
Code also cares about fire safety, and this is where DIY basements most often fail inspection. Foam plastic cannot stay exposed in living space; it needs a thermal barrier, which in practice means drywall over it. Fire blocking is required at the top of framed walls and around chases so fire cannot travel from the wall cavity into the floor system above.
A quick note on basement ceiling insulation, since homeowners ask about it. If you are finishing the basement into living space, the walls are what code and comfort care about; the basement ceiling is mostly a sound question, where fiberglass batts between joists quiet footsteps from above. Insulating the ceiling instead of the walls only makes sense if you intend to leave the basement cold and unfinished, which is not the project here.
Permits matter for a reason beyond legality. The insulation inspection happens before drywall, which means a second set of trained eyes looks at your moisture control layer while it can still be fixed for the cost of some tape and foam, not the cost of demolition.
Inherited a Half-Finished Basement? How to Read the Walls
Say a homeowner buys a 1950s rambler in Minneapolis and the previous owner framed and batted half the basement before losing steam two years ago. The stud walls are up, some wiring is run, batts are stuffed against the block, and nothing was ever inspected. The question is not whether the work looks straight. Additionally, the question is what is happening behind it.
Here is how to assess it without tearing everything out on day one:
- Pull a batt in two or three spots. Look at the back side, the one facing the concrete. Dark spotting, a musty smell, or damp fibers mean moisture has been condensing there, and those batts are done.
- Check the bottom plates. Press a screwdriver into the wood where the framing meets the slab. Soft, dark, or crumbly wood means water has been wicking up, and that section needs rebuilding.
- Look for a foam layer. If there is taped rigid foam between the batts and the concrete, the previous owner knew what they were doing, and the framing may be worth keeping. Bare batts against block are a rebuild signal.
- Check for plastic sheeting on the room side. Poly stapled over batts on a basement wall creates a moisture trap. It usually means the whole assembly comes down.
- Note the fire blocking, or the lack of it. Open tops of walls and unsealed chases will fail inspection regardless of how the insulation looks.
In that scenario, the honest answer is often mixed. The framing layout might be fine while the insulation is a total loss, or one wet wall needs rebuilding while three dry ones need only foam added behind them. A contractor who insists everything must go without pulling a single batt is guessing; so is one who promises everything can stay. Either way, wiring buried in those walls should be checked by a licensed electrician before drywall covers it, because insulation problems and wiring problems tend to hide in the same cavities.
What Getting the Insulation Right Costs, and What It Buys
For rough planning in 2026, insulating basement walls with taped rigid foam typically lands in the range of a few dollars per square foot of wall for materials, more with closed-cell spray foam, and more again with labor. Treat those as illustrative estimates; block walls, rubble foundations, and wall height all move the number. Against the full project, it is a small line item. According to Angi, an average basement remodel runs $30 to $75 per square foot of finished floor, and the insulation layer is a fraction of that.
The return on doing it right shows up two ways. First, comfort and durability: a foam-insulated basement holds a steady temperature, stays dry behind the walls, and does not develop the musty smell that makes people avoid their own finished basement. Second, value: the National Association of Realtors Remodeling Impact Report found homeowners recover 64% of basement finishing costs at resale, one of the better numbers among the 20 projects studied, and the same report gave finished basements a joy score of 9.5 out of 10 from the owners living with them.
The reverse math is worse. A basement finished over wet fiberglass eventually needs demolition, mold remediation, and a second finish job. Paying for drywall twice erases whatever the batts saved on day one.
Where Basement Insulation Fits in the Finishing Sequence
Insulation is not step one, and treating it as step one is how projects go sideways. The order that works, whether you are starting from bare concrete or rescuing someone else's stalled attempt, runs like this: fix water first, then plan the basement layout, then permit, then frame, insulate, inspect, and close up.
Moisture control comes before everything because foam on the walls manages vapor, not liquid water. Grading, gutters, and any needed drainage or waterproofing work happen while the walls are still bare. Layout comes next because wall locations determine where insulation, wiring, and plumbing land; sketching where a future basement bathroom or bedroom goes now saves rework later, even if that phase waits for next year's budget. Plenty of unfinished basement ideas die at this stage for good reason, because the fun decisions about flooring and paint only hold up if the boring layers behind them were sequenced right.
Then the wall assembly goes in: foam against concrete, framing in front, rough wiring and plumbing, batts in the bays, fire blocking, and the insulation inspection before a single sheet of drywall. On a typical single-basement project, the insulation phase itself takes days, not weeks; it is the moisture fixes and inspection scheduling around it that set the calendar.
Some of this sits within reach of a capable homeowner. Cutting and taping rigid foam is honest basement finishing DIY, and plenty of owners handle it well. However, spray foam application, moisture diagnosis on a wall that has already shown water, and anything involving buried wiring are places to bring in a professional, because mistakes there stay hidden until they are expensive.
The Short Version
Fiberglass against concrete fails in Minneapolis because it lets warm air reach cold walls and then holds the condensation. Foam wins below grade because it blocks air, retards vapor, and keeps the framing on the dry side. The best walls use both, foam first and fiberglass second. Fix water before insulating anything, pull a few batts before trusting anyone's verdict on an inherited half-finished basement, and get the insulation inspected before drywall hides it. Everything else about finishing a basement, from flooring to basement finishing ideas for the space itself, gets easier once the wall behind it is built to stay dry.
If you need basement finishing, Minneapolis Basement Finishing Pros can help.
Prefer to talk it through? Call (651) 758-8806 — a quick call is usually the fastest way to get a straight answer for your situation.