Interior vs. Exterior Basement Waterproofing: What Works in Minneapolis
If you own a Minneapolis property with a damp basement, you have probably searched "basement waterproofing exterior" and landed on a pile of national guides that all say the same thing. Dig up the foundation, apply a membrane, done. That advice is not wrong, but it skips the part that matters here: Minneapolis sits on heavy clay soil, our freeze-thaw cycles are brutal, and most of our housing stock has foundations that predate modern drainage entirely. Before you spend a dollar finishing that basement for resale or rental income, you need to know which waterproofing approach actually fits your house and your budget.
This guide walks through both sides of the decision: interior systems and exterior systems. It covers what each one fixes, what each one costs relative to the other, and how to sequence the work so you do not pour money into drywall that molds out in two years. If you are flipping a house or getting a duplex ready for a tenant, the goal is simple. Solve the water problem once, at the right price point, so the finished basement holds its value.
Why Minneapolis Basements Get Wet in the First Place
Minneapolis basements fight water on multiple fronts. The metro area's clay-heavy soil drains slowly, so water from rain and snowmelt sits against foundation walls instead of moving away. That standing moisture builds hydrostatic pressure, and pressure pushes water through any crack, joint, or porous patch of concrete it can find.
Add the freeze-thaw cycle. Water in the soil expands when it freezes, which widens hairline foundation cracks a little more every winter. Then spring snowmelt arrives all at once, often while the ground below is still partly frozen and cannot absorb it. That is why so many Minneapolis basements leak in March and April even if they stayed dry all summer.
Older foundations make this worse. Many houses here have stone or early concrete foundations, and stone walls were often mortared from the inside face and outside face separately. The mortar did not always run through the full thickness of the wall. That leaves hollow voids inside the wall itself, which can channel water from the soil straight to your basement floor. If you have ever wondered why water shows up ten feet from any visible crack, that is often the answer.
Moisture also moves as vapor, not just liquid. Vapor pressure pushes moisture through porous concrete even when you never see a drip. A finished wall built over that concrete without a plan for vapor movement will trap moisture in the framing cavity. This is the failure mode that ruins finished basements, and it is the reason waterproofing decisions have to come before layout, flooring, or framing decisions.
What Exterior Basement Waterproofing Actually Involves
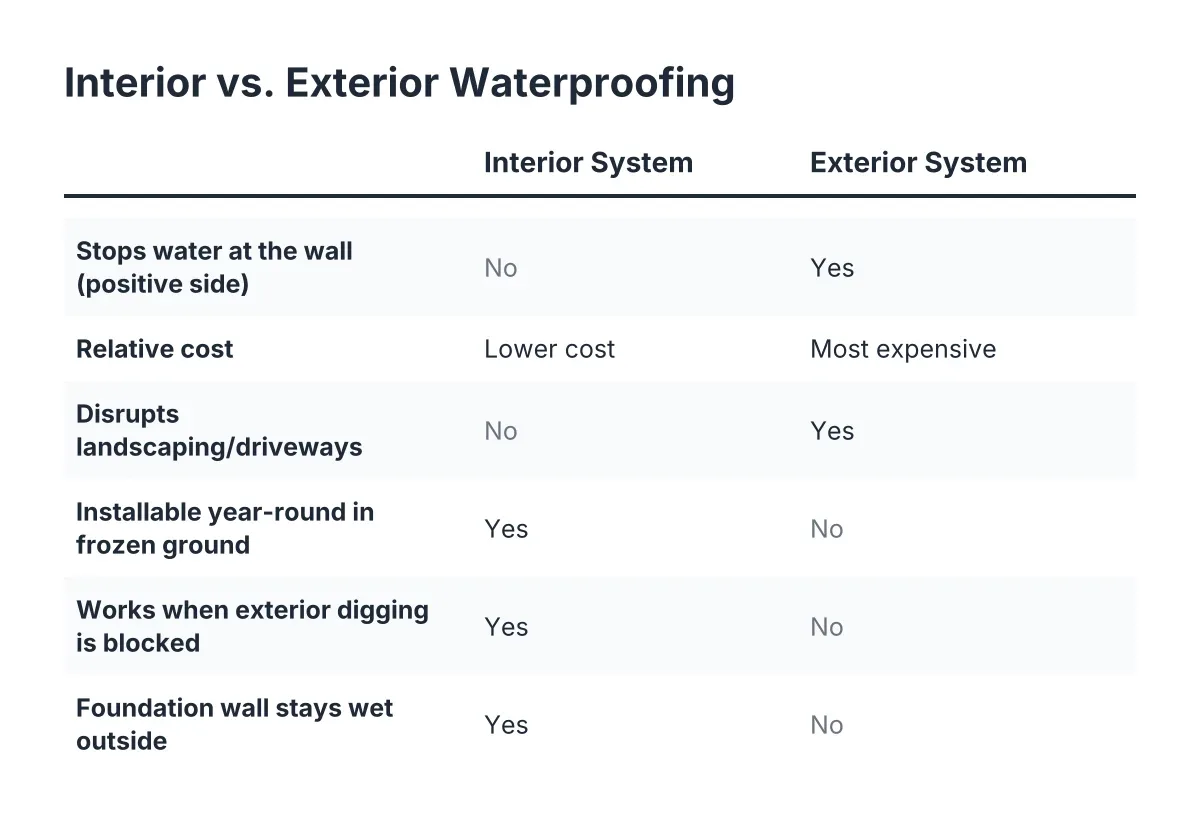
Exterior basement waterproofing means excavating the soil around your foundation down to the footing, then treating the outside of the wall so water never reaches the concrete. It is the only approach that stops water on the positive side, meaning the side the water pushes from. Done well, it keeps the foundation wall itself dry, not just the living space inside.
A full exterior job in 2026 typically includes several layers of defense:
- Excavation around the affected walls, down to the footing
- Cleaning and repairing the exposed foundation wall, including crack injection or repointing
- A waterproofing membrane applied to the exterior wall, either a liquid-applied coating or a sheet membrane
- A dimpled drainage board over the membrane to relieve soil pressure and give water a path down
- New drain tile at the footing, sloped to daylight or to a sump basin
- Backfill, ideally with material that drains better than the clay that came out
- Regrading so surface water runs away from the house
The strength of this approach is that it addresses the root cause. Water gets intercepted and drained away before it touches the wall. The exterior membrane blocks liquid water, the drainage board kills hydrostatic pressure, and the drain tile carries water off. For a foundation with active leaks through the walls, nothing else works as completely.
The weaknesses are cost and disruption. Excavating a foundation means tearing up landscaping, sidewalks, decks, and sometimes driveways. Waterproofing the exterior of basement walls on a full Minneapolis foundation is usually the most expensive moisture fix on the menu, and cost climbs fast when a patio or an addition blocks access to one wall. For a flipper running tight numbers, that price tag has to be weighed against what the finished basement returns at sale.
How Interior Waterproofing Systems Work
Interior waterproofing does not stop water from entering the foundation wall. Instead, it manages water after it arrives, collecting it at the base of the wall and pumping it out before it reaches the floor or the finished space. The standard system is interior drain tile: a channel cut into the slab perimeter, perforated pipe set in gravel, and a sump basin with a pump.
Many interior systems add a dimpled plastic sheet on the lower wall that directs any wall seepage down into the drain channel. Water still gets into the wall, but it never gets into the room. For a rental duplex where the priority is a dry, durable, code-compliant lower unit, this is often the practical choice.
Interior systems have real advantages for an investor:
- Lower cost than excavation in most cases, often by a wide margin
- No destroyed landscaping, driveways, or exterior structures
- Installable year-round, which matters when Minneapolis ground is frozen five months of the year
- Works even when a neighboring structure or property line makes exterior digging impossible
The trade-off is honest and worth stating plainly. The foundation wall itself stays wet on the outside. Interior drainage protects the living space, not the concrete. For most poured and block foundations in decent condition, that is an acceptable bargain. For a wall with serious structural movement, it is not, and that situation calls for an engineer before any waterproofing money gets spent.
One warning on shortcuts. Some sellers try to hide a water problem by pouring new concrete against an old wall to raise the floor or cap a leak. The seam between new and old concrete is a cold joint, and it will not hold back water. If you are evaluating a property and see fresh concrete along the base of an old stone wall, treat it as a red flag, not a repair.
Choosing Between Interior and Exterior Basement Waterproofing
The right choice comes down to where the water enters, the condition of the foundation, and what the property needs to earn. Exterior basement waterproofing wins when walls actively leak, when the foundation needs structural repair anyway, or when you already plan to excavate for another reason. Interior systems win when the problem is seepage at the floor-wall joint, hydrostatic pressure under the slab, or a budget that has to leave room for the finishing work itself.
Here is a practical way to sort your situation:
- Water stains high on the walls, or water visibly coming through wall cracks: exterior waterproofing, or at minimum exterior crack repair plus regrading and gutter fixes
- Water at the floor-wall joint, especially during spring melt: interior drain tile and a sump pump usually solve it at a fraction of the cost
- Damp, musty air but no liquid water: focus on humidity control, vapor management, and grading before paying for either system
- Stone foundation with water appearing far from any visible entry point: get a moisture assessment first, because hollow wall voids can make the entry point misleading
Suppose you bought a 1948 story-and-a-half in Minneapolis to flip, and the basement shows a damp line at the floor joint every April but dry walls the rest of the year. In that scenario, a full excavation would likely eat your margin without adding a dollar of resale value beyond what interior drain tile delivers. The buyer's inspector cares that the basement is dry and the sump pump runs. The appraiser cares that the square footage is finished and permitted. Neither pays extra for a membrane nobody can see, so match the fix to the symptom.
The economics support getting this right. According to Angi, an average basement remodel runs $30 to $75 per square foot. Remodeling Magazine's Cost vs. Value Report estimated a 70% national return on basement remodels, and Zonda / Journal of Light Construction data shows resale returns ranging from 23% to 86% depending on the market. The spread between a 23% recoup and an 86% recoup is often moisture. A basement that smells damp or shows efflorescence at showing time drags the whole project to the bottom of that range.
What About Waterproof Paint for Basement Walls?
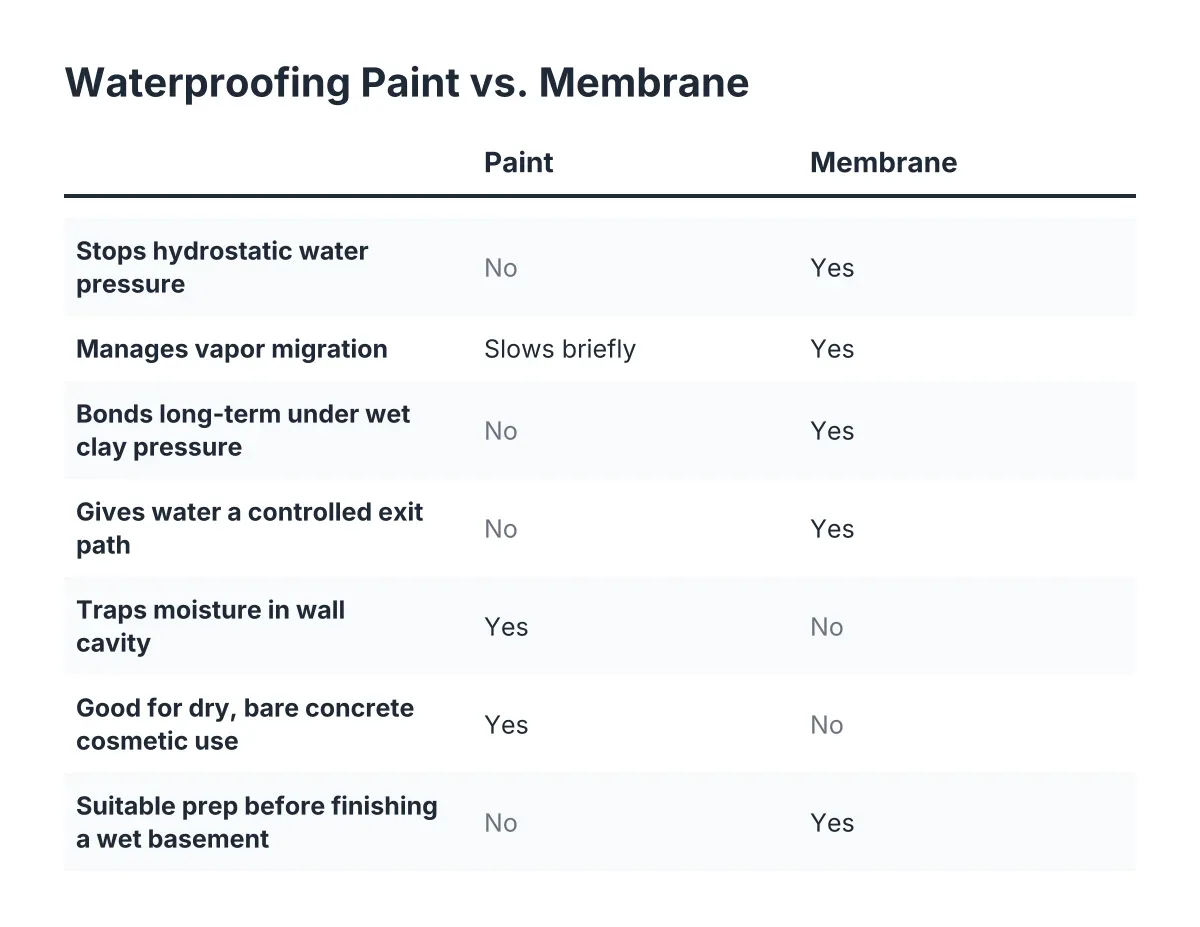
Waterproof paint for basement walls is a surface coating, not a waterproofing system, and it cannot resist real hydrostatic pressure from Minneapolis clay soil. Basement waterproofing paint and basement concrete wall sealer products have a legitimate role: they reduce vapor transmission and dampness through porous concrete in a basement that has no liquid water problem.
Used that way, a quality masonry sealer is a reasonable, low-cost layer in a broader moisture plan. Used as the entire fix for an actively leaking wall, it fails, and it usually fails after the drywall goes up. Coatings applied to the negative side of the wall fight the water pressure instead of blocking it at the source, so pressure eventually pushes moisture through or pops the coating off. If a listing brags about "freshly sealed basement walls" and nothing else, ask what the paint is covering.
Sequencing Waterproofing Before Basement Finishing
Whatever system you choose, the order of operations decides whether the finished basement lasts. Moisture and drainage have to be fully resolved before any insulation or framing goes in. Insulating over an unresolved moisture problem hides the water, holds it against wood and gypsum, and accelerates rot and mold behind the finished surface.
A sound sequence for a Minneapolis basement finishing project looks like this:
- Fix the cheap stuff outside first: extend downspouts, clean gutters, and regrade soil to slope away from the foundation
- Watch the basement through at least one heavy rain or spring melt to see what those fixes solved
- Install the chosen waterproofing system, exterior membrane and drain tile or interior drain tile and sump pump
- Address vapor and air movement in the wall and floor assemblies
- Only then frame, insulate, wire, and hang drywall
Steps four and five deserve detail, because this is where finished basements quietly fail. Basement walls need moisture managed in two directions. Warm interior air must not reach cold concrete, where it condenses inside the wall cavity. At the same time, moisture already in the wall needs a way to dry rather than a place to accumulate.
Therefore, skip the old habit of stapling polyethylene sheeting on the interior side of basement stud walls. An interior vapor barrier traps moisture in the cavity; anything that enters through air leaks or wall seepage has no path to dry back into the room. Air sealing matters more than vapor diffusion here, since air leakage carries far more moisture into a cavity than diffusion through materials ever will. Tight assemblies with foam insulation against the concrete outperform fluffy insulation behind plastic every time in this climate.
The floor follows the same logic. Under new concrete, a vapor barrier over the base course blocks ground moisture from moving up into the slab, according to W. R. Meadows. Over an existing slab, a dimpled subfloor panel raised slightly off the concrete lets moisture under the floor share air with the space behind the wall insulation, so water vapor can migrate to drier zones and escape instead of pooling under your flooring. For finish surfaces, paperless moisture-resistant gypsum board holds up far better than standard drywall in basement conditions, and it costs little extra on a whole-basement order.
For a landlord, this sequence is tenant-retention math. Say you own a duplex and the lower unit turns over every year because it smells musty by February. Spending on basement moisture control before the cosmetic refresh, rather than after the second mold complaint, is the difference between a unit that rents once and a unit that re-rents itself.
What Waterproofing Means for Your Numbers
Waterproofing is not the line item that adds value; it is the line item that protects the value everything else adds. Buyers and appraisers reward finished, dry, permitted square footage. The National Association of Realtors' Remodeling Impact Report gave basement finishing a joy score of 9.5 out of 10 among homeowners, which tells you how buyers feel about a basement done right. None of that survives a wet spring.
Budget realistically for the whole moisture scope, not just the headline system. Exterior work carries excavation, membrane, drainage board, drain tile, and restoration of whatever the digging destroyed. Interior work carries the drain channel, sump basin, pump, and often a battery backup, which is cheap insurance in a neighborhood where summer storms knock power out. Either path may also need a dehumidifier for ongoing basement humidity control, since even a bone-dry foundation cannot fix humid Minnesota summer air on its own.
Two closing cautions. First, if a foundation wall is bowing, cracking horizontally, or shifting, waterproofing is not the first call; a structural evaluation is, and no honest contractor should frame over that wall until it is resolved. Second, get the water story in writing before you buy. A moisture assessment on an unfinished basement costs little and can save a flip. The Minneapolis houses that punish investors are rarely the ones with obvious water. They are the ones where somebody painted, paneled, and prayed. Solve the water first, in the right order, and the finished basement earns what you built it to earn.
If you need basement finishing, Minneapolis Basement Finishing Pros can help.
Prefer to talk it through? Call (651) 758-8806 — a quick call is usually the fastest way to get a straight answer for your situation.