Drylok and Budget Waterproofing Paints: What They Really Do for Minneapolis Basement Walls
If you are getting ready to finish your basement and you have seen damp spots on the concrete, someone has probably told you to roll on a coat of Drylok first. Drylok is a budget waterproofing paint available everywhere in the basement finishing conversation, and for good reason. They cost less than a weekend's groceries, you can apply them yourself, and the cans promise to stop water. The real question is whether that promise holds up against a Minneapolis basement sitting in heavy clay soil, through spring thaw, summer humidity, and a freeze-thaw cycle that pushes water at your foundation from October to April.
Here is the straight answer up front: waterproofing paint can be a useful layer in the right situation, and a false sense of security in the wrong one. This guide walks through where Drylok and similar products actually help, where they fail, and how to decide before you hang a single stud. That matters whether you are a parent trying to turn an unfinished basement into a bedroom and playroom, or a landlord finishing a lower level in a duplex and hoping the walls hold up between tenants.
Why Minneapolis Basements Get Damp in the First Place
Before judging any product, you need to understand what it is up against. Most of Minneapolis sits on clay-heavy soil. Clay holds water instead of draining it. After snowmelt or a hard June rain, that saturated clay presses against your foundation walls like a wet sponge squeezed from the outside.
That pressure is called hydrostatic pressure, and it drives water through concrete in two ways. First, liquid water finds cracks, cold joints, and the seam where the wall meets the floor. Second, water vapor migrates through the pores of the concrete itself, even when the wall looks dry. Concrete is not a solid sheet; under a microscope it looks more like a hard sponge.
This second path is the one most homeowners miss. Vapor pressure pushes moisture through porous walls constantly. You will not see a puddle. You will see white chalky residue, musty smells, or paint peeling off in sheets a year after you finished the room. Any treatment that handles only the symptom, the damp spot you can see, without addressing that vapor migration tends to fail at the root cause.
Minneapolis adds one more wrinkle: the freeze-thaw cycle. Water in the soil freezes, expands, and opens hairline cracks in older foundations. Many homes here were built before the 1960s with block or even stone foundations, which are more porous than modern poured concrete. The older the foundation, the more a thin coat of paint is being asked to do.
What Drylok Budget Waterproofing Paints Actually Are
Drylok and similar products are cement-based or latex-based coatings designed to be thicker than ordinary paint. Instead of sitting on the surface, they are formulated to penetrate slightly into the pores of masonry and bridge them. Manufacturers rate them to resist a certain amount of hydrostatic pressure, measured in pounds per square inch.
That is the key distinction between waterproofing paint and regular basement paint. A standard latex wall paint sits on top of the concrete and will blister off the moment moisture pushes from behind. A masonry waterproofer bonds into the surface and resists some of that push. "Some" is the operative word.
In practice, these products come in a few tiers:
- Original latex-based waterproofers. The budget option, rated for modest hydrostatic pressure. Fine for walls with light dampness and no active leaks.
- Extreme or heavy-duty versions. Thicker, higher pressure ratings, better mildew resistance, and roughly double the price per gallon.
- Cement-based coatings. Mixed from powder, applied with a brush, and bonded more aggressively into masonry. More labor, better penetration on rough block.
For a typical Minneapolis basement, figure two coats over bare, cleaned masonry. One gallon covers less area than regular paint because the coating is thick and the block surface is rough. As a rough illustrative estimate, coating the walls of an average basement might run a few hundred dollars in materials and a long weekend of labor. That price point is exactly why Drylok budget waterproofing paint gets recommended so often; the downside risk feels small.
Where Budget Waterproofing Paint Works, and Where It Fails
When Drylok-style Coatings Help: A Waterproofing Paint Review
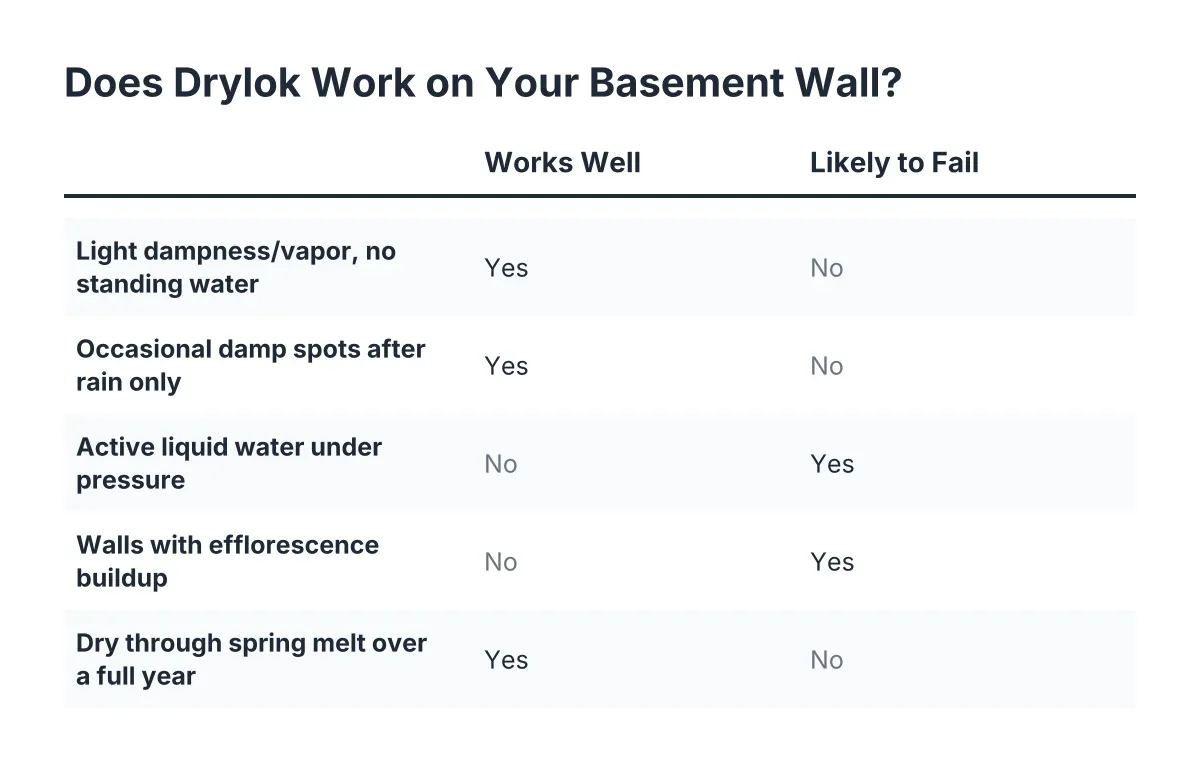
Drylok-style waterproofing paints work when the problem is minor dampness and vapor, not liquid water under pressure. If your basement walls show light moisture, occasional damp spots after rain, or seasonal mustiness, and you have never had standing water, a quality masonry waterproofer can cut vapor transmission and improve the space meaningfully. This type of waterproofing paint review confirms that Drylok excels at vapor reduction in the right application.
Good candidate situations look like this:
- Walls that feel cool and faintly damp in humid July weather but never show running water
- Older block walls with a dusty, slightly chalky surface and no efflorescence buildup
- A basement that stays dry through spring melt, confirmed over at least one full year
- An unfinished storage or utility area you want cleaner and brighter, not a future bedroom
In those cases, the paint acts as a vapor-slowing layer and a tidy finished surface. For a landlord with a duplex in an inner-ring suburb, a Drylok waterproofing paint review helps determine whether coating the utility side of a basement is cheap insurance and makes the space easier to show. Painting or epoxying a utility room floor also helps contain concrete dust so it does not drift into finished areas every time the door opens.
When Budget Waterproofing Paints Fail
Waterproofing paint fails whenever liquid water is pushing through the wall under real pressure. The coating is only as strong as its bond to the concrete, and hydrostatic pressure from saturated clay will eventually win. The paint blisters, bubbles, and peels, and now you have water plus a peeling mess.
Watch for these warning signs before you trust paint alone:
- Efflorescence. White, powdery mineral deposits mean water is moving through the wall and leaving salts behind. Paint over it and the salts will push the coating off.
- Active leaks or seepage. Water at the floor-wall joint, especially during spring thaw, means pressure that no coating resists for long.
- Horizontal cracks or bowing. These are structural signals of soil pressure. Paint is irrelevant here; get a professional evaluation before finishing anything.
- A history of standing water. If the basement has flooded even once, the fix is drainage, grading, gutters, or a sump system, not a coating.
- Painting over old paint. Waterproofers need bare masonry to bond. Applied over existing paint, they peel with it.
There is one more failure mode specific to finishing projects, and it is the one that costs Minneapolis homeowners the most. Paint the walls, call them waterproofed, then build insulated stud walls tight against them. Moisture still migrates through or around the coating, but now it condenses inside a wall cavity where you cannot see it. Add an interior plastic vapor barrier on the warm side and you have trapped that moisture completely; the cavity cannot dry inward, and mold gets a quiet, dark place to grow behind your new drywall.
How Waterproofing Paint Fits Into a Real Wall Assembly
Here is where the conversation needs to shift from "which paint" to "which wall system." A basement wall in Minneapolis has to manage moisture in two directions at once. It must keep warm indoor air from condensing on cold concrete in winter, and it must keep soil moisture from wicking into the framing and insulation year-round.
A coating like Drylok can be one layer in that system. It cannot be the system. A sound finished-basement wall generally includes a vapor retarder against the concrete, air-impermeable insulation, and an assembly that can still dry out if it ever gets wet. The two insulation types that check those boxes are taped rigid foam board and closed-cell spray foam. Both resist air movement, retard vapor, and deliver high insulation value per inch, which fiberglass batts stuffed against concrete do not.
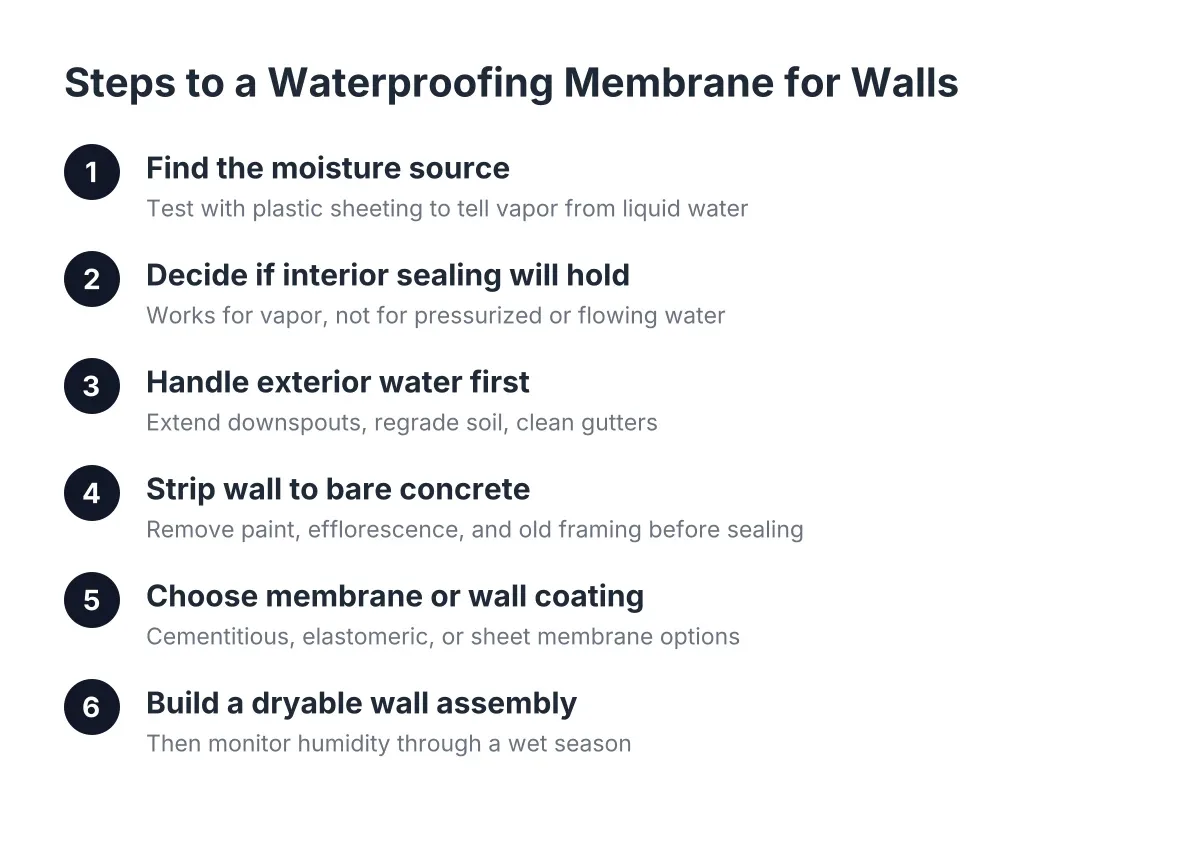
Some projects call for a dedicated waterproofing membrane for interior basement walls instead of, or on top of, a coating. These dimpled plastic membranes create an air gap against the concrete so any moisture drains down to the floor or a drain tile system rather than soaking the framing. Pairing a dimpled subfloor panel with that wall approach lets moisture under the floor and behind the walls share air and migrate toward drier zones instead of accumulating in one spot.
Floors deserve the same thinking. Under a concrete slab, a vapor barrier over the base course blocks ground moisture from moving up into the concrete, according to W. R. Meadows. Most older Minneapolis homes have no such barrier under the slab, which is why the floor sweats in summer and why glued-down flooring fails. That is a problem paint on the walls does nothing to solve, and it shapes which basement flooring makes sense.
Drywall choice matters too. Paperless or moisture-resistant gypsum board resists mildew far better than standard drywall in a basement. The upcharge is small against the cost of cutting out moldy standard board three years in.
This is the heart of basement moisture control: manage water as a system, from gutters and grading outside to the wall and floor assembly inside, rather than betting the project on a single product.
A Realistic Scenario: Paint Alone vs. Paint Plus a Plan
Suppose a family in Minneapolis wants to turn an unfinished basement into a bedroom and family room because a second kid arrived and the upstairs is full. The walls show faint dampness each spring and a little white residue near one corner. Say they roll on two coats of budget waterproofing paint, frame the walls with fiberglass batts and poly sheeting, and hang drywall.
In that scenario, the first two winters seem fine. By year three, the carpet near the exterior wall smells musty. Behind the drywall, the poly trapped condensation in the cavity, the batts are damp, and the painted block behind them shows blisters where the spring moisture kept pushing. The fix now means demolition, mold remediation, and rebuilding, which can easily run several times the cost of doing the moisture work first. All figures here are illustrative, but the pattern is the common one.
Now run the same project with a plan. The homeowner spends a season confirming how the walls behave, extends downspouts, and regrades one low spot against the foundation. The coating goes on bare block as a vapor-slowing layer, not a leak-stopper. Additionally, the wall gets taped rigid foam against the concrete, framing held off the wall, no interior poly, and paperless drywall. Total added cost over the shortcut version is moderate; the finished rooms stay dry.
The stakes are worth protecting. Homeowners gave basement finishing a joy score of 9.5 out of 10 in the National Association of Realtors Remodeling Impact Report, and the same report found 64% of basement finishing costs recovered at resale, among the highest of 20 projects studied. A moldy wall cavity erases both numbers.
Are Drylok Budget Waterproofing Paints Worth It Before Finishing?
For a Minneapolis basement, Drylok budget waterproofing paints are worth using as a low-cost vapor-reducing layer on bare masonry in a basement that is already fundamentally dry. They are not worth trusting as the sole defense before you bury the wall behind insulation and drywall, especially in clay soil with real seasonal water pressure. Evaluating whether Drylok waterproofing paint deserves a role in your project requires knowing where it fits in a complete moisture strategy.
Use this decision path:
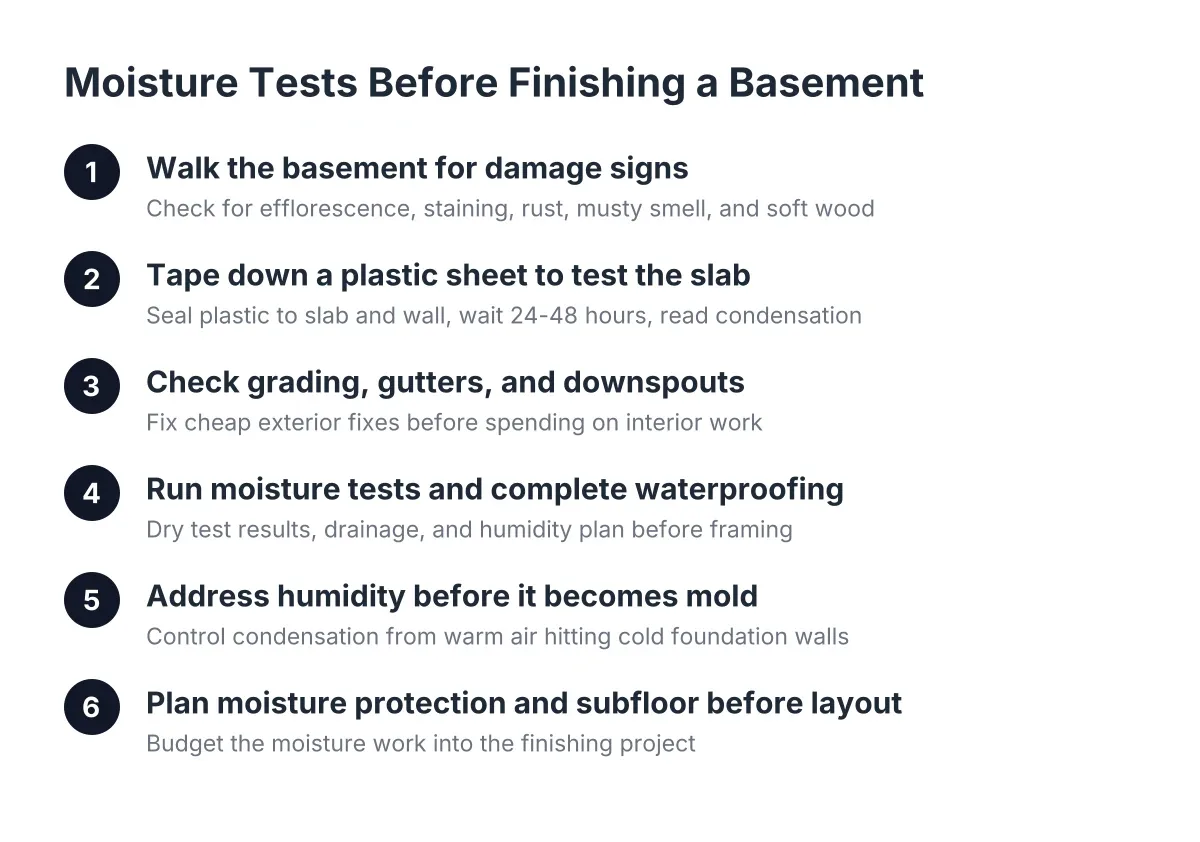
- Watch the basement through a full spring melt. One wet season tells you more than any product label.
- Fix water at the source first. Gutters, downspout extensions, and grading solve a large share of Minneapolis seepage for less than interior fixes.
- Match the product to the problem. Dampness and vapor: a coating helps. Liquid water under pressure: you need drainage, a sump system, or a membrane, not paint.
- Build a wall that can dry. Rigid foam or closed-cell foam against the wall, no interior poly, moisture-tolerant drywall.
- Get a professional read before framing. Structural cracks, chronic seepage, or a planned basement bathroom change the moisture plan, and a local contractor who knows Minneapolis foundations can tell you in one walkthrough whether paint is enough.
One honest limitation: no article can diagnose your basement. Two houses on the same block can behave differently because of grading, downspouts, or a long-forgotten drain tile. If you see efflorescence, bowing, or any history of standing water, bring in a professional before you spend money on finishing.
For landlords, the math is the same with a different payoff. A finished lower unit or bonus room only earns higher rent if it stays dry through turnover after turnover. As of 2026, average basement remodels run $30 to $75 per square foot according to Angi, so protecting that spend with a few hundred dollars of correct moisture work is the obvious trade. Spending the same few hundred on paint in the wrong application protects nothing.
The bottom line: budget waterproofing paint is a tool, not a plan. Used on the right wall, in the right assembly, it earns its modest cost. Asked to hold back Minneapolis clay on its own, it will lose, and it will take your new drywall with it. Sort out the moisture first, then finish the basement once, the right way.
If you need basement finishing, Minneapolis Basement Finishing Pros can help.
Prefer to talk it through? Call (651) 758-8806 — a quick call is usually the fastest way to get a straight answer for your situation.