DIY vs. Professional Basement Flooring in Minneapolis, MN: When to Hire Help
Deciding between DIY and professional basement flooring comes down to three things: what your slab is doing with moisture, which material you picked, and how much of your finished basement rides on getting it right. The choice of DIY vs professional flooring depends on moisture levels, material selection, and project complexity. In Minneapolis, MN, the slab question matters more than anywhere else, because our clay soils, spring thaws, and long freeze cycles push moisture up through concrete year-round. This list walks through eight decision points, from the jobs a careful homeowner can handle to the ones where hiring a pro protects the whole project.
Quick framing before the list. Some basement flooring installs are honest weekend work. Others hide problems for a year, then show up as cupped planks, musty carpet, or peeling epoxy right when the kids finally have their playroom. The goal here is to help you sort your project into the right column before you spend a dollar.
1. Start With a Moisture Test, Not a Material
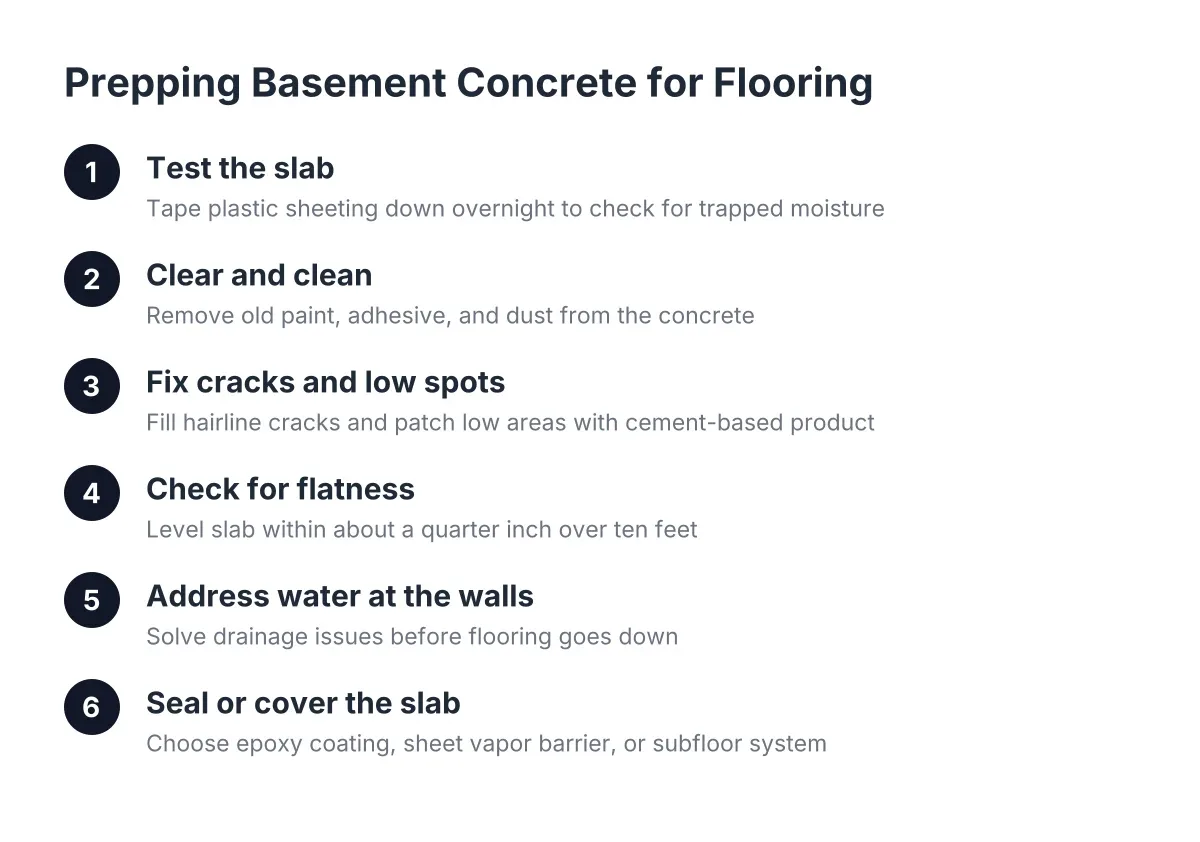
Before any DIY or professional basement flooring decision, tape a two-foot square of clear plastic sheeting to your bare slab and leave it for 48 hours. If you come back to condensation or a dark spot on the concrete, your slab is transmitting moisture from the ground, and that changes everything about the install. This test costs a few dollars and settles arguments that flooring samples cannot.
A vapor barrier placed over the base course under a concrete slab is meant to block moisture transmission from the ground into the concrete above, according to W. R. Meadows. However, many Minneapolis basements were poured decades before that practice was standard. If your house predates it, assume moisture is moving through the slab and plan the floor around that fact.
2. Luxury Vinyl Plank Is the Safest DIY Bet
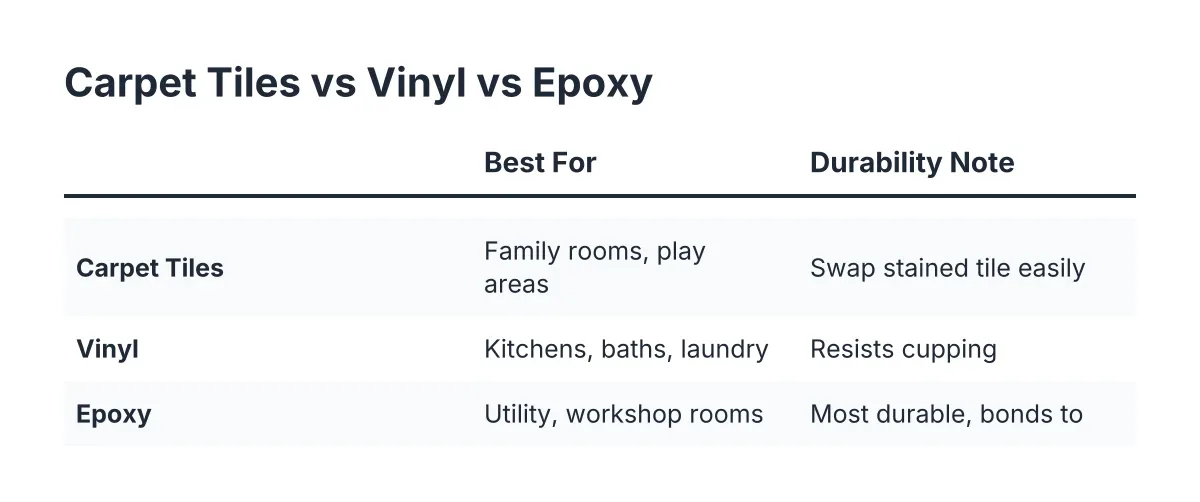
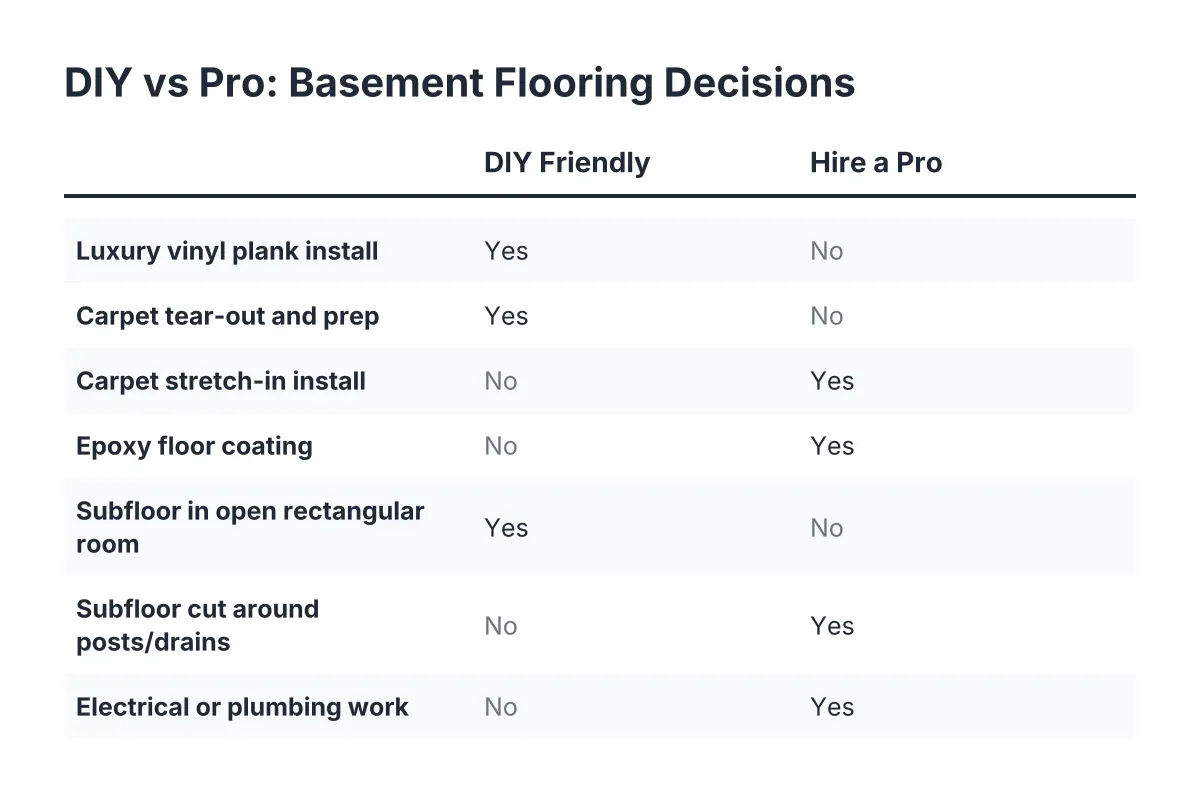
If your moisture test comes back reasonable and the slab is flat, luxury vinyl plank is the material most homeowners can install themselves without regret. It resists humidity, and it does not cup, bow, or buckle the way solid or engineered wood can in a below-grade room. Click-lock planks float over the slab, so there is no glue to fight and no nailer to rent.
The catch is flatness. LVP telegraphs every hump and dip in old concrete, so budget a day for patching low spots before the first plank goes down. For a growing family, LVP in a main basement family room paired with area rugs is a common, durable layout that survives spilled juice and winter boots.
3. Carpet Belongs in the Playroom, but Hire the Stretch
For a kids' play area, carpet is close to essential. It is soft when a toddler falls, it cuts the echo that makes finished basements sound like gyms, and it is one of the lower-cost basement flooring options compared to premium plank products. Choose a synthetic fiber and a moisture-resistant pad rated for below-grade use.
Installation is where DIY carpet goes wrong. Stretching wall-to-wall carpet takes a power stretcher and practice; a loose install ripples within a year. A reasonable split is to handle the tear-out and prep yourself, then pay an installer for the stretch-in. Labor on carpet is modest compared to hard-surface trades, so the hire is cheap insurance.
4. Epoxy Basement Floor Installation Punishes Shortcuts
Epoxy basement floor installation looks like a paint job and behaves like chemistry. The coating only bonds to concrete that has been properly ground or etched, and it fails fast over a slab that is pushing moisture. If your plastic-sheet test showed condensation, a standard DIY epoxy kit will likely peel within a couple of Minneapolis seasons.
Professionals bring diamond grinders, moisture-tolerant primers, and the judgment to walk away from a slab that needs mitigation first. Epoxy still earns a place in the right spot, though. Coating the floor of a utility or mechanical room helps contain concrete dust so it does not migrate into the finished living space every time the door opens.
5. A Subfloor System Is the Line Between Weekend Job and Real Build
Raised subfloor panels with dimpled plastic undersides create an air gap over the slab, keep finished flooring warmer underfoot, and give minor moisture somewhere to go. Even a basement with a vapor barrier under the slab can benefit from a subfloor system, because it protects the finished renovation from future moisture events like a water heater leak or a wet spring.
Here is the honest split. Laying interlocking subfloor panels in an open rectangular room is achievable DIY work. Cutting them around posts, floor drains, a future basement bathroom rough-in, and out-of-square foundation walls is where homeowners burn a weekend and still end up with squeaks. If your layout has more than a couple of obstructions, get a bid before you buy panels.
6. Know Where DIY Ends and Licensed Trades Begin
Flooring rarely lives alone in a basement remodel. The moment your project touches wiring for floor outlets, in-floor heat, or moving a drain for a basement bathroom, you are into licensed territory. Experienced remodelers routinely recommend hiring a licensed electrician and plumber even when the homeowner handles framing, drywall, and finish work, because those trades require licensing and skill that a weekend cannot replace.
The upside of a basement is that it forgives learning. Cosmetic imperfections in DIY carpentry are rarely seen down there, as long as everything stays watertight. Therefore a sensible plan for a hands-on homeowner is: DIY the demo, prep, and floating floor; hire out the trades and anything structural.
7. Run the Numbers Before You Pick a Side
Cost is usually why homeowners consider DIY, so put estimates on paper first. According to Angi, an average basement remodel runs $30 to $75 per square foot all-in, and flooring is one of the few line items where sweat equity genuinely moves the number. As an illustrative estimate, DIY LVP in a 600-square-foot basement might cost $2,500 to $4,000 in materials, while a professional install of the same floor could add $1,500 to $3,000 in labor.
Weigh that saved labor against what a failed floor costs. Tearing out cupped planks or moldy carpet means paying for the material twice, plus disposal. In addition, the payoff for doing it right is real: homeowners gave basement finishing a joy score of 9.5 out of 10 in the National Association of Realtors Remodeling Impact Report, and the same report found 64% of basement finishing costs recovered at sale, one of the highest recovery rates among 20 projects studied. That resale math only holds when the floor is still flat and dry at listing time.
8. Two Scenarios: When DIY Basement Flooring Works, When Professional Help Pays
Suppose a homeowner in Minneapolis, MN has a dry 1990s slab, a flat open room, and a plan for an LVP family room where the kids can spread out. That project is a strong DIY candidate: moisture test passes, material is forgiving, and no trades are involved. A careful weekend or two gets it done, and any small seam flaw hides under a rug.
Now suppose a small landlord is turning over a duplex where the city flagged the basement unit, the slab sweats every June, and the plan includes a basement bathroom and durable flooring tenants will not destroy. In that scenario, professional installation pays for itself: a contractor coordinates moisture mitigation, subfloor, plumbing, permits, and inspections in one sequence, keeps the unit's turnover timeline short, and delivers a floor that survives tenant after tenant. Rental math rewards durable and low-maintenance over cheap and fast.
A Simple DIY vs. Professional Basement Flooring Checklist
Use this quick sort before you commit either way:
- Moisture test shows condensation or dark concrete: hire a pro, or fix moisture first
- Slab has cracks, heaving, or more than a quarter inch of dip over ten feet: get a professional assessment
- Floating LVP or foam tiles in a dry, open room: solid DIY project
- Wall-to-wall carpet: DIY the prep, hire the stretch-in
- Epoxy over a damp or dusty slab: professional grind and moisture-tolerant system
- Anything touching wiring, plumbing, or a basement bathroom: licensed trades, with permits pulled before work starts
One honest limitation: no article can read your slab. A floor choice that works in a dry walkout basement can fail in a house two blocks away with a high water table. If your moisture test results are ambiguous, or the basement has ever taken water, have a local contractor look at the slab before you order material. Most local basement finishing contractors, including operations here in Minneapolis and the surrounding area, will walk the space and give a free estimate, which costs you nothing but an hour and can save the whole floor.
If you need basement finishing, Minneapolis Basement Finishing Pros can help.
Prefer to talk it through? Call (651) 758-8806 — a quick call is usually the fastest way to get a straight answer for your situation.