Epoxy Floor Basement Guide: Waterproof Flooring Steps for Minneapolis Homes
Minneapolis basements sit below grade, often on clay soil that holds water. That is why an epoxy floor basement plan starts with moisture, not color chips. A properly cured epoxy coating does more than look clean; it works as a monolithic vapor barrier, air control layer, and capillary break, blocking moisture and soil gas from moving through the slab into your living space. This guide walks you through the process step by step, so you can decide whether epoxy, or another waterproof flooring option, is right for your basement before anyone opens a bucket.
One note up front for anyone worried about code and permits. A floor coating itself usually does not need a permit in Minneapolis. However, if the flooring is part of a larger basement finishing project, or if you are converting space into a legal bedroom, permits and inspections come into play. Get straight answers on that before the flooring goes down, not after.
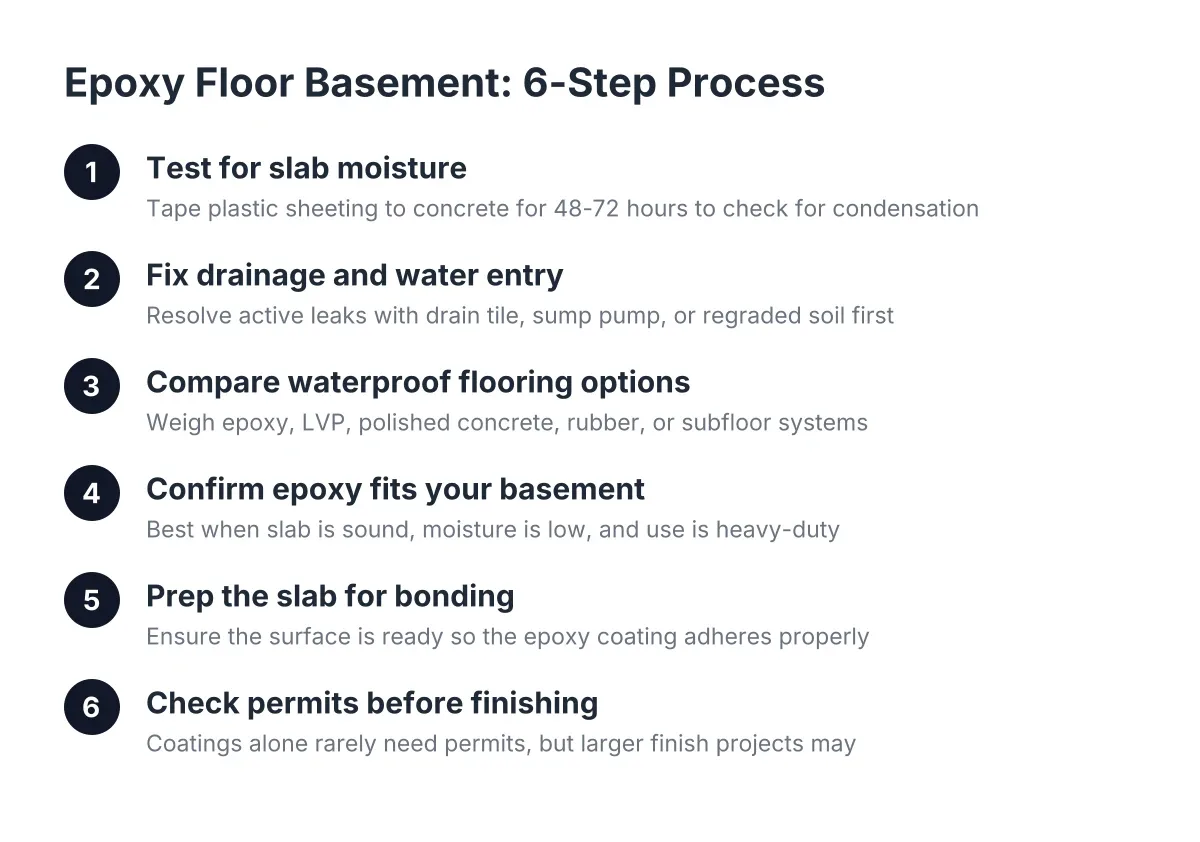
Step 1: Find the Moisture Before It Finds Your Floor
First, test the slab. Basement moisture problems are usually driven by vapor pressure pushing water through porous concrete. If you skip this step, that vapor collects under whatever you install and causes the failure you were trying to prevent.
The simple test: tape a two-foot square of clear plastic sheeting to the bare concrete, seal all four edges, and wait 48 to 72 hours. If condensation forms under the plastic or the concrete darkens, moisture is coming up through the slab. Run the test in two or three spots, including near exterior walls and any old crack.
Also walk the perimeter after a hard rain. Look for efflorescence (white chalky residue), damp corners, or staining where the wall meets the floor. Many older Minneapolis homes have slabs poured with no vapor barrier underneath. According to W. R. Meadows, a vapor barrier placed under a concrete slab is there to block moisture transmission from the ground into the concrete above. No barrier means the slab itself is your only defense, and that changes which flooring makes sense.
Step 2: Fix Drainage and Water Entry First
Next, solve any active water problem before you spend a dollar on flooring. This is the step landlords and sellers are most tempted to skip, and it is the one that decides whether your investment lasts.
Insulating or finishing over unresolved moisture is how basements rot from the inside. If water enters at the wall-floor joint, you may need interior drain tile, a sump pump, or regraded soil outside. One fix to avoid: pouring new concrete against an old stone or block wall to raise the floor and "seal" it. The cold joint between new and old material will not hold back water, and the problem just moves.
If your basement stays dry through spring melt and summer storms, and the plastic-sheet test shows only mild vapor, you can move to flooring. If not, bring in a professional to diagnose the water path. Coating over an active leak fails every time.
Step 3: Compare Waterproof Basement Flooring Options
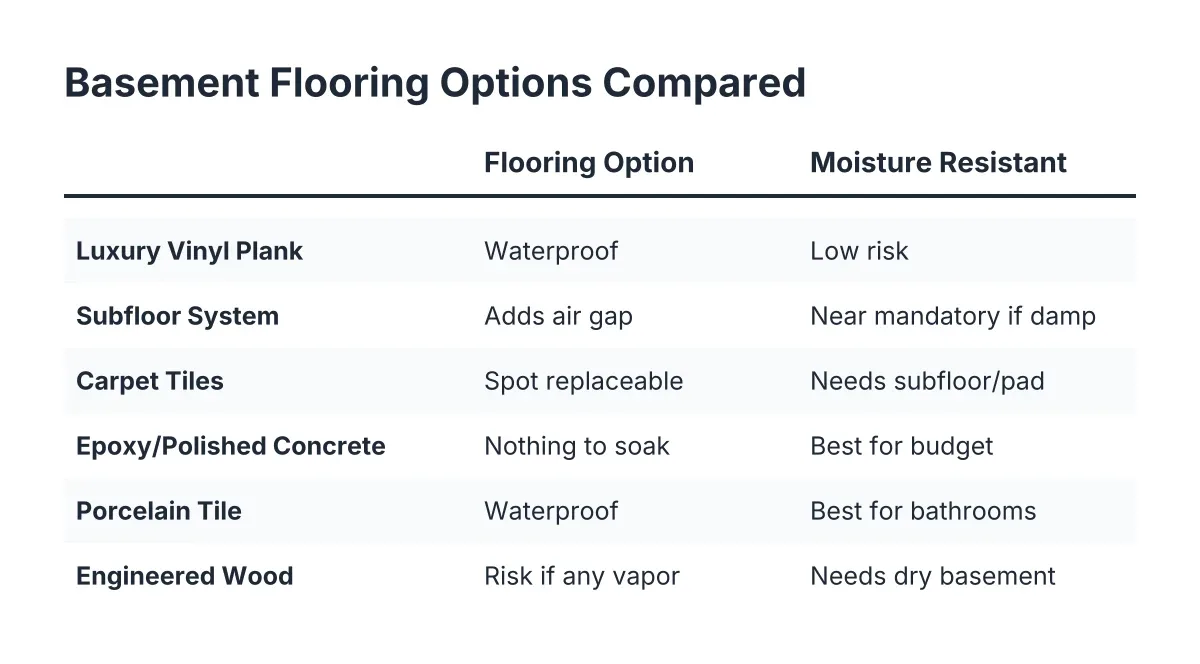
A truly waterproof basement floor comes down to a short list. Each handles moisture differently, and the right pick depends on how you will use the space.
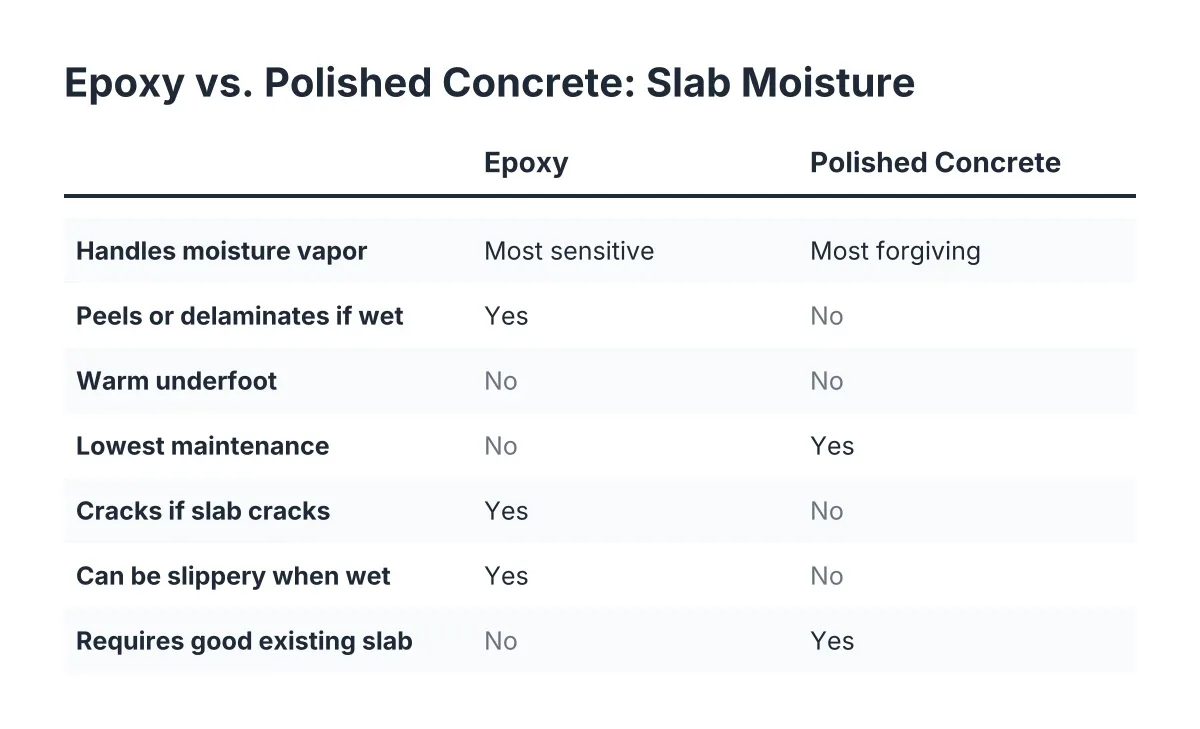
- Epoxy coating. Bonds directly to the slab and, once cured, seals it against vapor and capillary moisture. Hard, durable, and easy to clean. Best when moisture at the slab is minimal and any wall drainage is already handled.
- Luxury vinyl plank (LVP). Resists humidity and will not cup, bow, or buckle the way solid or engineered wood can. Warmer underfoot than epoxy and a common choice for basement bedrooms and family rooms.
- Polished concrete floor. No coating to peel, and moisture in the slab can still breathe. Cold underfoot, so plan on area rugs in living areas.
- Rubber flooring for basement gyms or playrooms. Waterproof, forgiving, and quiet. Usually installed over a sealed or coated slab rather than as the only defense.
- Subfloor system plus finished flooring. Dimpled membrane panels raise the finished floor slightly off the concrete, letting water vapor migrate to drier zones and escape instead of accumulating. Even a slab with an existing vapor barrier benefits from this protection against future moisture events.
Carpet deserves a mention because it is a lower-cost option and cuts echo in a finished basement. Over a bare slab in Minneapolis, though, carpet holds moisture. If you want carpet, put a subfloor system under it.
For context on budget, an average basement remodel runs $30 to $75 per square foot according to Angi, and flooring is one line inside that number. It pays off; the National Association of Realtors found 64% of basement finishing costs are recovered at sale, one of the highest returns among 20 projects studied.
Step 4: When Epoxy Flooring Works Best in a Basement
An epoxy floor basement setup makes the most sense when three things are true: the slab is sound, moisture readings are low, and the space will see hard use. Think laundry rooms, workshops, utility rooms, and rental units where durability beats warmth underfoot.
For a small landlord, the math is straightforward. Suppose you own a duplex in an inner-ring suburb and the basement laundry area gets tenant traffic year-round. In that scenario, an epoxy coating gives you a floor that shrugs off detergent spills, mops clean between tenants, and does not need replacing at turnover the way carpet or cheap vinyl might. Coating the utility room floor also contains concrete dust, so it does not migrate into finished living space every time the door opens.
Epoxy has trade-offs. It is hard and cold, so it is a poor fit for a bedroom or a kids' play area unless you add rugs or rubber mats. It also demands a dry slab. When wall drainage is handled and slab moisture is minimal, a fluid-applied epoxy compatible with concrete is a solid way to seal the floor. When moisture is high, epoxy can blister or peel, and a subfloor system with LVP is the safer call.
One more distinction: concrete basement floor paint is not the same product as a two-part epoxy. Paint sits on the surface and wears through in traffic lanes within a few years. Epoxy chemically cures into the slab surface. If you see epoxy floor basement kits priced like a gallon of paint, read the label; many are epoxy-fortified paint, not true 100% solids epoxy.
Step 5: Prepare Your Basement Floor Slab So the Epoxy Coating Bonds
Preparation decides whether epoxy lasts fifteen years or peels in two. The slab needs a clean, open surface profile, which means grinding or acid-etching, not just mopping.
Grind or etch the entire floor, fill cracks and spalls with an epoxy-compatible patch, and vacuum until a hand wiped on the floor comes up clean. Watch for blisters in the existing concrete; according to NRMCA, blisters in cured concrete come from trapped air, often caused by floating the surface too soon or by a vapor barrier that kept water from absorbing into the subgrade. Blistered or dusting concrete may need extra grinding before any coating will hold.
Humidity and temperature matter too. Epoxy cures slowly in a cold Minneapolis basement, so most installs happen when the slab is above the product's minimum temperature, and a dehumidifier runs during cure. This is where an epoxy floor basement DIY weekend often goes wrong; the material is unforgiving of shortcuts, and a failed coat costs more to remove than a professional install would have cost up front.
Step 6: Line Up Flooring With Permits and the Rest of the Finish
Finally, sequence the flooring with the rest of the project. If flooring is the whole job, you are close to done. If it is part of a basement finishing or basement remodeling project, the order matters, and so does the paperwork.
For the homeowner who just learned the basement bedroom is not legal, here is the honest sequence. Egress, framing, electrical, and any basement bathroom rough-in get permitted and inspected first. Flooring goes in near the end, after drywall and paint. Choosing waterproof basement flooring does not make a room a legal bedroom; the room has to meet habitable-space requirements, and the city inspector signs off on the permitted work. Handle it in that order and you will not pay for a floor twice.
Say a homeowner in Minneapolis is converting the basement for a teenager before a home sale. In that hypothetical, the smart path is a moisture test in week one, drainage fixes if needed, permitted structural and electrical work, then a subfloor system with LVP for the bedroom and epoxy in the adjacent utility room. Each material lands where it performs best. The payoff is real; homeowners gave basement finishing a joy score of 9.5 out of 10 in the NAR Remodeling Impact Report.
Basement flooring is the layer you walk on, but in a below-grade space it is also part of your moisture defense. Test first, fix water second, and match the material to the room. Do those three things and your finished basement will still look right the next time an inspector, an appraiser, or a tenant walks down the stairs.
If you need basement finishing, Minneapolis Basement Finishing Pros can help.
Prefer to talk it through? Call (651) 758-8806 — a quick call is usually the fastest way to get a straight answer for your situation.