Basement Bathroom Layout: 8 Fixture Placement Rules for Tight Spaces
Most basement bathrooms fail before the first pipe gets cut. They fail on paper, when someone sketches a layout around where they want the toilet instead of where the drain can actually go. Getting the basement bathroom layout fixture placement right in a tight space comes down to two things: where your existing drain lines sit, and whether gravity or an ejector pump will move waste out of the room. This list walks through both, plus the clearance rules that trip up homeowners and small landlords in Minneapolis when the inspector shows up.
If you own a duplex or a rental with an unfinished basement, this matters twice over. A basement bathroom done to code adds real rentable value. One done wrong becomes a line item on a city inspection report, and a headache when you sell.
Here are eight placement rules that decide whether a small basement bathroom works or fights you for the next twenty years.
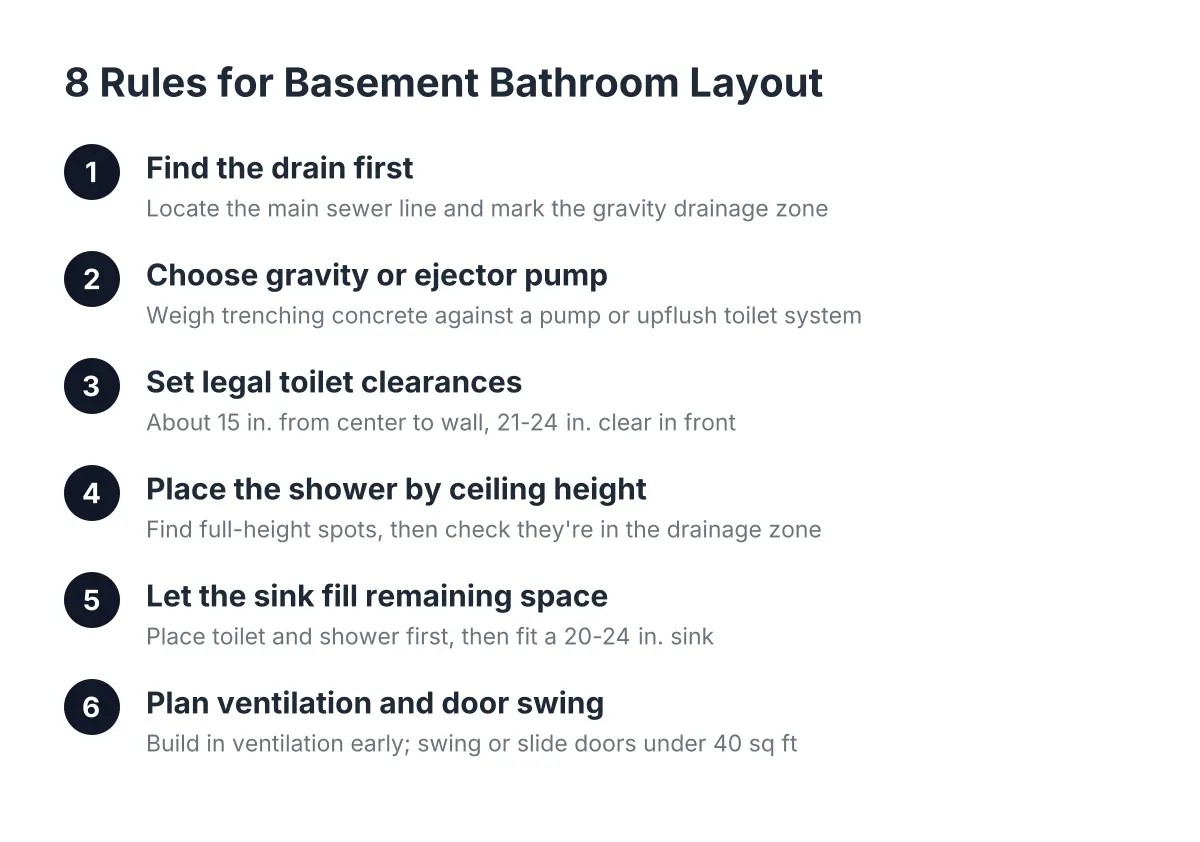
1. Find the Drain First, Then Place Every Fixture Around It
The location of your main sewer line decides your layout before you decide anything. In most Minneapolis basements, the main drain exits through the floor or the foundation wall on one side of the house. Fixtures that sit close to that line, and above its depth, can drain by gravity. Fixtures that sit far away, or below the line, need a pump.
Therefore, the first step in plumbing a basement bathroom is not picking tile. It is finding the drain, checking its depth, and marking the zone where gravity still works. Everything in your basement bathroom layout, fixture by fixture, should be measured from that point.
Some older homes already have a rough-in: a capped drain stub in the concrete floor left by the original builder. If you have one, your toilet location is largely decided for you, and your budget just got easier.
2. Know the Gravity vs. Ejector Pump Tradeoff Before You Commit
Gravity drainage is simpler, quieter, and has no moving parts to fail. However, it only works if your fixtures sit above the sewer line, or if you break concrete to run new drain lines at the right slope. Breaking a trench through a slab adds labor cost, dust, and time, but it is a one-time expense.
An ejector pump (a sealed pit in the floor that grinds and pumps waste up to the main line) lets you put a bathroom almost anywhere. The tradeoffs are real, though:
- The pump runs on electricity, so a power outage means no flushing until power returns.
- The pit and pump need occasional service, and pumps do wear out.
- You will hear it cycle. Placement matters if a bedroom shares the wall.
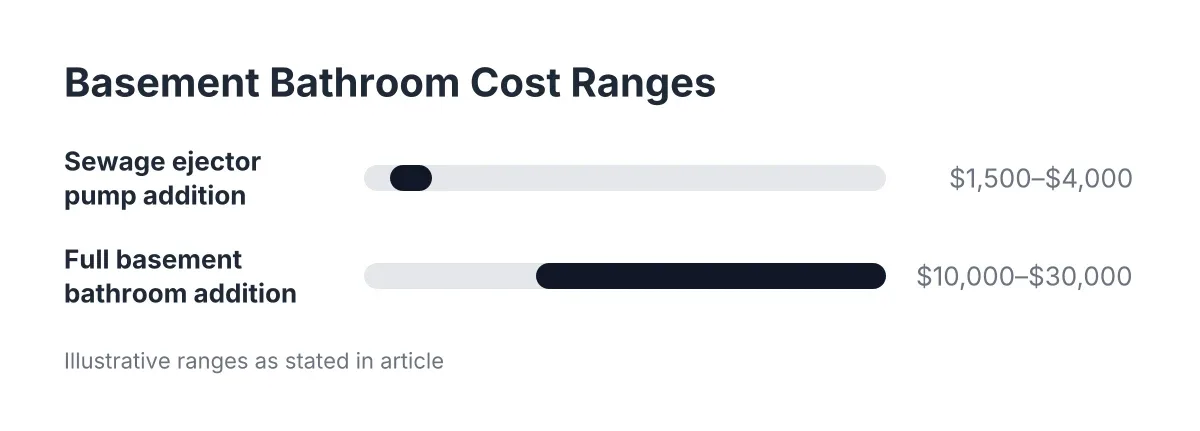
- Upfront cost is often comparable to trenching, so location, not price, usually decides.
An upflush toilet system is a third option: a self-contained macerating unit that sits behind the toilet and pumps waste up through small-diameter pipe. It avoids breaking concrete entirely, which makes it popular for rentals where downtime costs money. The tradeoff is noise, a visible unit, and a shorter service life than buried plumbing.
There is no universally right answer here. A landlord finishing a basement in a triplex might pick an upflush system to keep the unit rentable during the work. A homeowner adding a permanent family bathroom usually gets more long-term value from trenched gravity lines.
3. Give the Toilet Its Legal Clearances, Not Just a Spot That Fits
Toilets have code-required breathing room, and this is where tight basement bathrooms most often fail inspection. As a general rule under the plumbing codes used in Minnesota, you need about 15 inches from the center of the toilet to any side wall or fixture, and roughly 21 to 24 inches of clear space in front of the bowl. Your local inspector confirms the exact numbers for your permit.
For example, say a homeowner in Minneapolis frames a 5-by-6-foot bathroom and centers the toilet 12 inches off the new wall. The framing passes, the drywall goes up, and then the rough-in inspection flags the clearance. Now the wall moves, or the drain moves, and both cost money. Measuring clearances before framing costs nothing.
This is the single best argument for pulling a permit instead of working around one. The inspector checks your basement bathroom layout and fixture clearances at rough-in, before the walls close, when fixing a mistake is still cheap.
4. Put the Shower Where the Ceiling Height Allows It
Basement ceilings are the hidden layout constraint nobody sketches. Ductwork, beams, and drain lines from the floor above eat headroom, and a shower needs full standing height plus room for the showerhead. Habitable-space height rules apply to finished basements, so a shower tucked under a duct run can sink the whole plan.
Walk the basement with a tape measure before you draw anything. Find the spots with full clear height, then see whether one of them sits inside your gravity drainage zone. If the only full-height corner is 20 feet from the main drain, that fact alone may push you toward an ejector pit.
In addition, a corner shower with a curtain or sliding door often beats a swinging glass door in a small basement bathroom. Among small bathroom ideas with a shower, the 36-by-36-inch corner unit remains the workhorse because it needs no door swing clearance at all.
5. Let the Sink Float to Wherever Space Remains
The sink is your most flexible fixture. Its drain is small, its vent can often tie into a nearby line, and wall-hung or pedestal models free up floor area that a vanity would swallow. Place the toilet and shower first, since they carry the hard constraints, then fit the sink into what is left.
However, resist the urge to shrink the sink to nothing. A rental bathroom with a 12-inch corner sink photographs poorly and annoys tenants daily. A 20-to-24-inch wall-hung sink usually fits even a 5-by-7 room without crowding the toilet clearance.
6. Plan Ventilation Into the Layout, Not After It
Basement bathroom ventilation is a layout decision, not an afterthought, because the exhaust fan needs a duct path to the outside. Below grade, that means running duct up through joist bays to an exterior wall or the rim joist. The farther your bathroom sits from an exterior wall, the longer and more expensive that duct run gets.
Moisture is the reason this matters more in a basement than anywhere else in the house. Basements in Minneapolis already run damp for much of the year. Adding a shower without a properly ducted fan feeds mold, ruins drywall, and shows up on a future buyer's inspection report. Venting into the joist cavity or a soffit does not count and will not pass.
As a result, when you compare two possible bathroom locations, weigh the duct path alongside the drain path. A spot that is slightly worse for plumbing but sits against the rim joist can be the smarter overall pick.
7. Swing the Door Out, or Slide It, in Rooms Under 40 Square Feet
Door swing is dead space, and in a 5-by-7 bathroom it can be a third of the floor. An in-swinging door that clears the toilet and the vanity dictates fixture placement more than most people expect. Two fixes solve it:
- Swing the door outward into the finished basement, where a hallway or rec room can absorb it.
- Use a pocket door or a surface-mounted barn-style slider, which needs zero swing clearance.
A pocket door costs more in framing but pays off every day the bathroom gets used. For landlords, sliders on exposed hardware are easier to repair between tenants than pocket hardware buried in the wall.
8. Sketch the Basement Bathroom Layout With Fixture Templates Before Anyone Cuts Concrete
Paper is cheap; concrete is not. Draw the room to scale, cut out paper rectangles for the toilet, shower, and sink at their real dimensions with code clearances included, and move them around. Ten minutes of this exposes conflicts that would otherwise appear as change orders.
While you sketch, keep the bigger budget picture in view. According to Angi, an average basement remodel runs $30 to $75 per square foot, and a bathroom is the densest, most expensive square footage in that range. Getting the layout right the first time protects the return: the National Association of Realtors Remodeling Impact Report found homeowners recover about 64% of basement finishing costs at sale, one of the higher figures among the 20 projects studied. A bathroom that passed inspection with a permit on record is part of what makes that number real at appraisal time.
This is also the stage to loop in a contractor or plumber, even if only for an hour of layout review. Drain depth, venting paths, and slab conditions vary house to house, and a wrong guess about any of them gets expensive. Any basement bathroom remodeling project in Minneapolis needs a plumbing permit and inspections, and a good layout review before demolition is what makes those inspections uneventful.
Common Questions About Basement Bathroom Layout and Fixture Placement
How small can a basement bathroom be?
A basement bathroom with a toilet, sink, and shower can work in about 5 by 7 feet, or 35 square feet, if fixture clearances are respected. A half bath with just a toilet and sink can fit in roughly 3 by 6 feet. Below those sizes, code clearances for the toilet become hard to meet.
Tight rooms demand discipline. Every one of the basement bathroom ideas that works at this scale, corner showers, wall-hung sinks, and pocket doors, exists to reclaim inches that standard fixtures waste.
Do I need a permit to add a basement bathroom in Minneapolis?
Yes. Adding a bathroom involves new drain, water, vent, and electrical work, and as of 2026 all of it requires permits and inspections in Minneapolis. The rough-in inspection happens before walls close, which protects you: problems get caught while they are still cheap to fix.
Skipping the permit creates the exact problem the pre-listing inspection crowd knows well. Unpermitted plumbing surfaces during a sale, and buyers either walk or demand the work be opened up and inspected. For a landlord, unpermitted work can also surface during a city rental inspection, with the same result on a deadline.
Should I choose an ejector pump or break the concrete slab?
Choose gravity and trenching when the bathroom sits near the main drain and you plan to own the property long term; choose an ejector pump or upflush system when the bathroom must sit far from the drain, or when breaking the slab is impractical. Cost between the two options often lands closer than homeowners expect.
The honest tradeoff: trenched gravity lines cost more disruption now and nothing later, while pumps cost less disruption now and carry maintenance forever. For a rental, factor in who answers the phone when a pump fails on a Saturday.
The Layout Is the Project
Fixtures, finishes, and flooring all get chosen later. The drain location, the clearances, the ceiling height, and the vent path are the project, and they are decided in the layout stage, before anyone touches a saw. Get those four things confirmed against your actual basement, with a permit in hand, and a tight basement bathroom stops being a gamble. It becomes a straightforward build with a predictable inspection at the end.
If you need basement finishing, Minneapolis Basement Finishing Pros can help.
Prefer to talk it through? Call (651) 758-8806 — a quick call is usually the fastest way to get a straight answer for your situation.