Basement Waterproofing Paint vs. Membrane: What Actually Stops Leaks in Minneapolis
If you are searching for basement waterproofing using paint or a membrane before you finish your Minneapolis basement, here is the short version: paint hides moisture for a while, and a membrane manages it. Neither one, on its own, fixes the reason your walls are wet in the first place. That reason usually lives in the clay soil pressing against your foundation, not in the concrete itself.
This matters more here than in most of the country. Much of Minneapolis sits on heavy clay soil that holds water like a sponge. When that clay gets saturated in spring, it pushes water and water vapor through your foundation walls under pressure. Any product you put on the inside of that wall is fighting physics from the wrong side. So before you spend a Saturday rolling on waterproofing paint, or a lot more on a membrane system, it helps to understand what each one actually does, where each one fails, and what has to happen before either one earns its keep.
This guide walks through that decision the way a contractor would explain it at your kitchen table. No product pitch. Just what stops leaks, what does not, and how to avoid burying a moisture problem behind drywall you will pay to tear out later.
Why Minneapolis Basements Get Wet in the First Place
Water shows up in Minneapolis basements for three main reasons: saturated clay soil pushing water through the walls, vapor migrating through porous concrete, and warm indoor air condensing on cold foundation surfaces. Most wet basements here involve at least two of the three, which is why one product rarely solves the whole problem.
Start with the soil. Clay does not drain the way sandy soil does. When snow melts in March or a July storm dumps two inches of rain, that clay swells and holds water against your foundation for days. The pressure this creates, called hydrostatic pressure, forces liquid water through cracks, cold joints, and the pores of the concrete itself.
Even when no liquid water gets through, vapor does. Concrete is porous. Moisture in the soil creates vapor pressure that pushes water vapor through the wall constantly, even when the wall looks dry. This is the part most generic waterproofing guides skip, and it is the part that decides whether paint or a membrane makes sense for your basement.
Finally, there is condensation. In a Minnesota summer, humid air hits foundation walls that stay cool year-round. Water beads up on the concrete, and homeowners often mistake it for a leak. The fix for condensation is different from the fix for leaks, so knowing which one you have matters before you buy anything.
What Basement Waterproofing Paint Actually Does
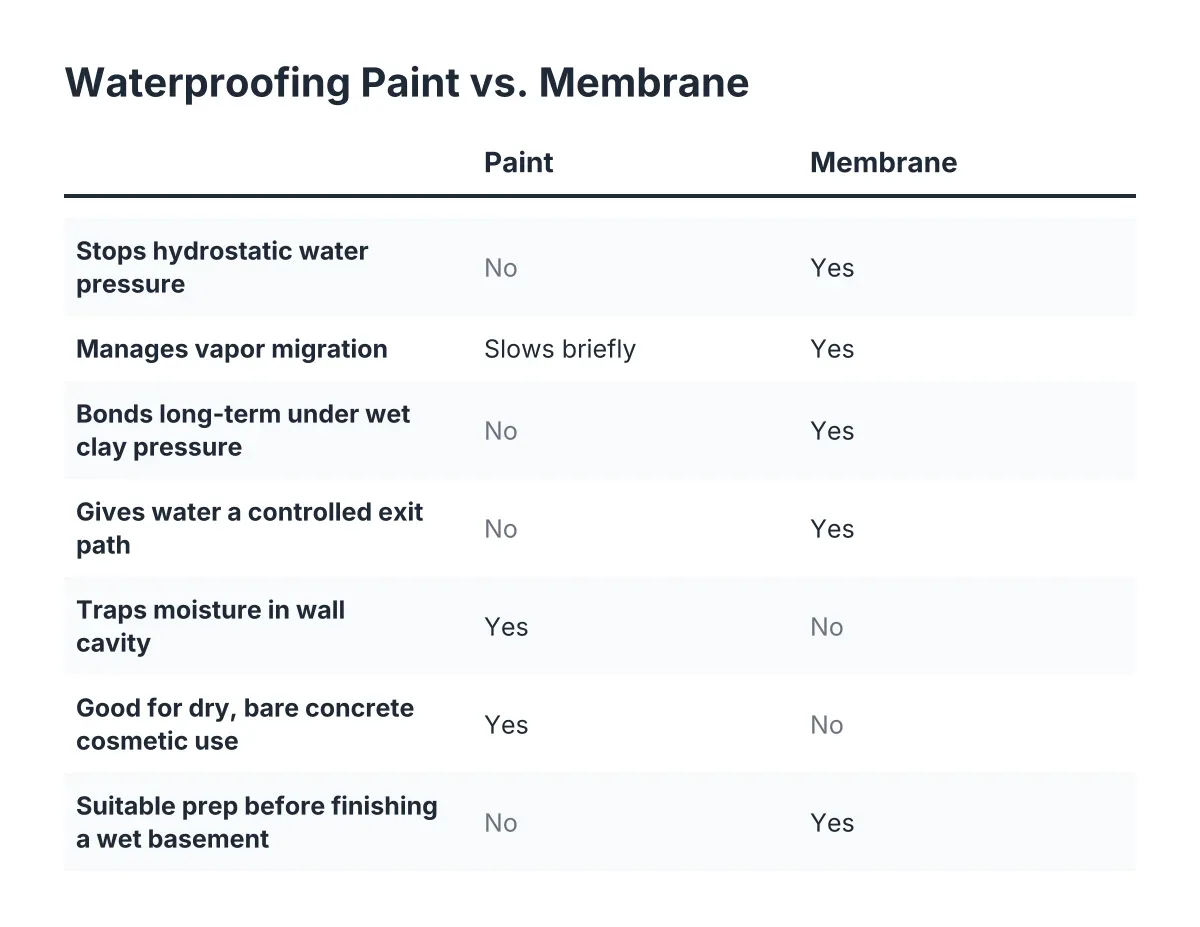
Waterproofing paint is a thick coating, usually cement-based or latex-based, that you roll onto the inside of a foundation wall. It fills surface pores and can resist a modest amount of water pressure. For a basement with minor dampness and no active leaks, it can reduce the musty feel and slow vapor coming through the wall.
Here is the honest limitation. Paint bonds to the surface of the concrete. The water is coming from behind that surface, under pressure from saturated clay. Over time, that pressure works on the bond between paint and concrete. The coating blisters, flakes, and peels, often within a few seasons in a basement with real moisture. When it fails, it fails behind your finished walls, where you cannot see it.
There is a second problem specific to finishing. Paint traps moisture inside the concrete wall. The wall stays wet longer, and if any of that moisture finds a path into the framing and insulation you build against it, it has nowhere to dry. A damp wall cavity behind drywall is how mold problems start in finished basements.
So where does paint make sense? A few honest use cases:
- A basement that stays dry year-round, where you want a cleaner look on bare concrete you plan to leave exposed
- A utility or storage room where a coated wall or an epoxied floor helps keep concrete dust out of the finished space next door
- A short-term cosmetic refresh on a house you are not finishing, where you disclose the moisture history anyway
Notice what is not on that list: prepping a wet basement for finishing. If your wall has ever shown a water line, efflorescence (that white chalky residue), or peeling paint from a previous owner's attempt, another coat of paint is not the answer.
How Waterproofing Membranes Compare to Paint
A membrane does not try to seal water inside the wall. Depending on the type, it either blocks water outside the foundation or manages water that gets through, directing it somewhere harmless. That difference in strategy is why membranes outlast paint in wet basements.
There are three broad categories worth knowing:
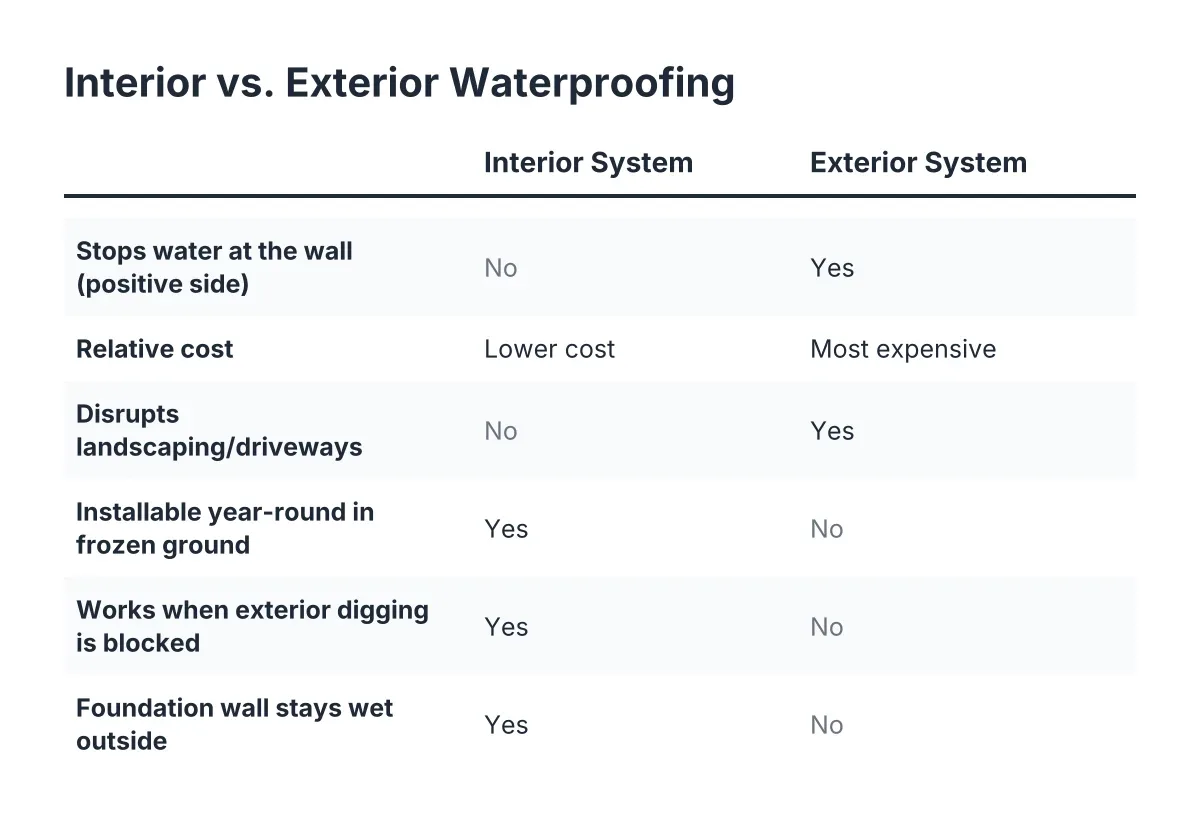
- Exterior membranes. A crew excavates down to the footing and applies a waterproof sheet or coating to the outside of the foundation, usually with new drain tile at the base. This is the most complete fix because it stops water before it touches the wall. It is also the most expensive and disruptive, since it means digging up landscaping, sidewalks, or a deck.
- Interior dimpled membranes. A dimpled plastic sheet goes against the inside of the wall or under the subfloor. It does not stop water from entering the concrete. Instead, it creates an air gap so any water that gets through drains down to a drain tile system and a sump pump instead of soaking your framing and flooring.
- Liquid-applied membranes. Thicker and more flexible than paint, these coatings bridge hairline cracks better. Applied inside, they still face the same pressure-from-behind problem as paint, just with more tolerance. Applied outside during excavation, they perform like an exterior membrane.
For a basement you plan to finish, the interior dimpled membrane paired with drain tile and a sump pump is the workhorse. It accepts that some water will always move through a Minneapolis foundation and gives that water a controlled exit. A dimpled subfloor panel does the same job under your basement flooring, lifting the finished floor slightly off the slab so vapor underneath can move and dry instead of soaking into carpet or wood.
There is a related detail under the slab itself. According to W. R. Meadows, a vapor barrier placed over the base course under a concrete slab blocks moisture transmission from the ground into the concrete above. Older Minneapolis homes often have no vapor barrier under the slab at all, which is one reason floors in these basements sweat. You cannot retrofit one under an existing slab, but a dimpled subfloor achieves a similar result from above.
Basement Waterproofing Paint vs. Membrane: The Direct Comparison
For stopping actual leaks, a membrane system wins, and it is not close. Paint resists dampness on a wall that is mostly dry already. A membrane, paired with drainage, handles a wall that takes on real water every spring. The right choice depends on which basement you have, so be honest about yours.
Here is how the two stack up on the questions that matter before finishing:
- Active leaks or seasonal seepage: Membrane with drain tile and a sump pump. Paint will peel, usually within a few years.
- Damp-feeling walls, no visible water: Either can work, but check first whether it is condensation. Tape a square of plastic to the wall for 48 hours. Water behind the plastic means moisture is coming through the wall; water on top means it is condensation, and a dehumidifier is your first move, not a coating.
- Cost: Paint runs a few hundred dollars in materials for a typical basement. Interior membrane and drainage systems typically run several thousand, and full exterior excavation can run into the tens of thousands. These are broad illustrative ranges; bids vary with foundation type and access.
- Lifespan behind finished walls: Paint fails where you cannot see it. A membrane and sump system keeps working, and a sump pump can be inspected and replaced without opening a wall.
- Effect on resale: Buyers and inspectors in Minneapolis know what peeling waterproofing paint means. A documented drain tile and sump system reads as a solved problem. Fresh paint over old water stains reads as a hidden one.
That last point matters if you are finishing this basement to sell or rent. The National Association of Realtors Remodeling Impact Report found that 64% of basement finishing costs are recovered at sale, one of the highest recovery rates among the 20 projects studied. However, that number assumes the finished space holds up. A basement that grows mold behind the drywall in year two does not recover anything; it becomes a disclosure item and a renegotiation at closing.
Where the Paint-Only Approach Costs Flippers Real Money
Suppose an investor buys a 1950s rambler in Minneapolis with an unfinished basement and a faint water line about a foot up the block wall. Say the plan is a quick finish: roll two coats of waterproofing paint, frame the walls, install carpet, and list in the spring. Total moisture budget in that scenario, maybe $400.
Now play the spring forward. The clay saturates, hydrostatic pressure pushes water through the block, and the paint holds just long enough for the sale to close. The buyer's first wet April becomes an inspection dispute, a mold remediation bill, or a claim. Compare that to spending several thousand on interior drain tile, a sump pump, and a dimpled membrane before framing. In this hypothetical, the membrane route costs more upfront and protects the entire margin on the flip. That is the trade every ROI-focused owner should run before picking a product off a shelf.
Why Waterproofing Basement Walls from the Inside Needs the Right Assembly
Waterproofing basement walls from the inside works when you treat the wall, the drainage, and the framed assembly as one system. The coating or membrane is only one layer. What you build against it decides whether the basement stays dry or quietly grows mold behind the drywall.
Two rules do most of the work here. First, moisture control has to run in both directions. You are keeping soil moisture from wicking into your framing, and you are keeping warm indoor air from condensing on cold concrete. Second, air leaks move far more moisture into a wall cavity than vapor diffusion does. An airtight assembly matters more than any single product.
In practice, that points to two insulation options for Minneapolis basement walls: taped rigid foam board against the concrete, or closed-cell spray foam. Both block air, both retard vapor, and both keep warm room air away from the cold wall so it cannot condense. Fiberglass batts stuffed directly against concrete do the opposite. They let air reach the cold wall, collect condensation, and hold it against your studs.
Here is the mistake that catches first-time finishers most often. Adding a plastic vapor barrier on the room side of the studs, the way you might in an above-grade wall, traps moisture inside the basement wall cavity. Any water that enters through a small leak, air movement, or wicking has no way to dry toward the room. Homeowners assume any vapor barrier helps; in the wrong location, it accelerates the exact mold problem it was supposed to prevent. Good basement moisture control means letting each part of the assembly dry in at least one direction while blocking bulk water and air where they enter.
One more failure mode worth naming because it shows up in older Minneapolis houses: pouring new concrete against an old stone or block wall to raise the floor or "seal" the base of the wall. The seam between new and old concrete, the cold joint, will not hold back water. It looks solid and leaks anyway.
What DIY Waterproofing Can and Cannot Handle
Do it yourself basement waterproofing makes sense for the outside-the-house work: grading, gutters, downspouts, and sealing obvious gaps. It stops making sense once the fix involves drain tile, sump systems, or structural cracks. Knowing where that line sits saves first-time finishers from paying twice, once for the DIY attempt and again for the real fix.
Start with the free and cheap moves, because in a surprising number of Minneapolis basements they cut the moisture problem in half:
- Extend downspouts at least six feet from the foundation so roof water does not dump into the clay beside your wall
- Regrade soil so it slopes away from the house on all sides
- Clean gutters before spring melt and fall rains
- Run a dehumidifier through summer and watch the humidity reading; below about 50% relative humidity, condensation problems mostly disappear
- Seal visible hairline cracks with hydraulic cement or an epoxy injection kit as a stopgap, and monitor them
If the basement still takes on water after a wet week with all of that done, the problem is below grade, and diy waterproofing basement products off a shelf will not reach it. Cutting the slab for interior drain tile, tying it to a sump basket, and pitching everything correctly is a job for a crew that does it weekly. The same goes for any crack that is widening, offset, or horizontal, which can signal structural movement in the wall. That calls for a foundation professional before any finishing plan moves forward, and no coating should go on until it is resolved.
There is a permit angle too. In Minneapolis, finishing a basement involves permits and inspections, and an inspector will notice a wall assembly built over an unresolved moisture problem. Sorting the water out first is cheaper than reopening a finished wall after a failed inspection or a wet spring.
When Paint, a Membrane, or Neither Comes First in Your Finishing Plan
A basement waterproofing paint or membrane decision comes third in a sound finishing plan, not first. Fix water at the source outside, verify the basement stays dry through a wet season, and then choose the interior protection that matches your remaining risk. Product choice made in that order almost picks itself.
Here is the sequence that protects your budget in 2026, whether you are finishing for your own family or for resale:
- Handle bulk water outside. Gutters, downspouts, grading, and window well drainage. This is where most Minneapolis water problems start and where the cheapest fixes live.
- Watch through one wet stretch. Spring melt or a heavy rain week tells you more than any product label. A basement that stays dry needs far less interior protection than one that seeps.
- Match the interior system to what you saw. Dry wall, condensation only: dehumidification and a correct insulation assembly may be all you need. Damp walls, no liquid water: a dimpled membrane or subfloor adds cheap insurance. Any seepage at all: drain tile, sump pump, and membrane before a single stud goes up.
- Build an assembly that can dry. Rigid foam or closed-cell spray foam against the wall, no interior poly, and flooring that tolerates a concrete slab.
The payoff for doing this in order is not abstract. The 2017 Remodeling Cost vs. Value Report from Remodeling Magazine estimated a 70% national return on basement remodels, and Zonda's data in the Journal of Light Construction shows the range runs from 23% to 86% depending on the market. The basements that land at the top of that range are the ones that still look and smell right five years after the carpet went in. Moisture handled correctly is the difference between the two ends of that spread.
Paint has a place, a membrane has a bigger one, and both work only after the water outside has somewhere better to go. Get that order right, and the rest of your basement finishing project, layout, flooring, even a basement bathroom, gets built on a floor and walls you can trust.
If you'd rather have a professional handle it, Contact Minneapolis Basement Finishing Pros is the place to start.
Prefer to talk it through? Call (651) 758-8806 — a quick call is usually the fastest way to get a straight answer for your situation.